Holly-Wood.it  
    Brick 1 x 3
Brick 2 x 2 Corner    
  Brick 1 x 1  
[ english ] deutsch ] italiano ]
 
  Home > MLCad > Tutorial: Digital building - Page 7 of 9  
     
  Page <Previous 1 2 3 4 5 6 7 8 9 Next>  
 

Adding a step background image


  (The screenshot shows all menus and dialogs in one composed image).
Screenshot 24
 
  62. To get your building instruction ready for shipping return to the top of the Project Parts List and Add > Step Background from the contextual menu (as usual there is also an entry in the main menu or a toolbar bottom Step Background Button available) as very first command below the project's title. This will guarantee that all steps have the same background image. If you add the background after a step command it will be displayed in the step following the Step Background command line, while the previous step(s) will have the background color defined in Edit & View mode options box of the Rendering tab in the MLCad Settings. You may add more than one image having a different background in every step but in case there are more than one Step Background definitions between two step commands the last definition will be used. Brick 3x3
  63. Browse... for your background image in the pop-up dialog. MLCad supports only true-color bitmap images so don't wonder if your PNG, GIF or JPG files aren't shown in your file explorer. Don't worry if the colors in the preview window don't correspond; MLCad uses a limited color range for the thumbnail generation to save memory and computer power. The final background will be in true-color.
MLCad does not add your background image physically to the project but just records the path where the image is stored. Taking the example above it adds the following command line:

0 BACKGROUND "C:\Background4.bmp"

to the project. If no image can be found in the "C:\" directory the program will additionally search the folder where the actual project file is stored. With no image at hand MLCad substitutes the background image with the default background color, so make sure you provide also the image when sharing your project file with others. Also pay attention to the resolution. If you're going to save a building instruction in 640x480 your background image has to have an identical size. Using for example a 800x600 pixel background but saving a 640x480 pixel instruction your background will be cut. Saving a series of 1600x1200 step images MLCad won't stretch the background but use a tile pattern.
Obviously you'll have to save all these modifications ... name the file Basic_04.ldr.

Some hints on the style: Avoid images with too much detail that would distract or draw your user's attention away from the part/model/layout itself. Use gradients, monochrome or bleached out images and prefer an abstract motive over a real picture. Download the backgrounds I use for my instructions and have a closer look:
 
   
Background 1 Background 2 Background 3 Background 4
800 x 600 800 x 600 800 x 600 800 x 600


The view mode


  Brick 1x3
Screenshot 25
 
  64. You might wonder what I'm talking about all the time since all you can see is the project being built brick by brick: No steps, no rotated views, background images or such! To see the building steps you must switch to MLCad's View Mode. Press the F2 key, the alternatives accesses are Settings > View Mode in the menu or the icon representing a slide show View Mode Button in the Mode bar.
The pressed View Mode icon ...
 
  Brick 1x4
   
   Brick 2x2
65. ... and most of the other tool bars or menus which are needed to modify a project are grayed out. You'll also finally see the background image if one has been added. Based on the resolution of the image and the resolution of your screen you'll see portions of it or a tile pattern. In View Mode zooming the project or panning doesn't work, and ...
66. ... by now you'll surely have found out that the Projects Parts List is locked and that a click in the panes offering the orthogonal views (Front, Right, Top) of the building area will shift to the next building step in a cycle jumping back to the first step once it has reached the last. Also the Parts Tree/Parts Preview pane isn't of any use either. Therefore it is best to hide them altogether and get more of the 3D viewing areas by expanding the building area all the way up and to the left. It is also good to know that MLCad remembers the last position, orientation and size of the window, panes and toolbars, separately for View and Edit Mode. Let me quote from the MLCad help guide you can reach selecting Help > Help Topics:
  • The information (about position, orientation ...) is stored and retrieved each time the mode changes. To configure the window you have to follow these steps:
  • Switch to the desired mode first (e.g. menu "Settings/View Mode" or "Settings/Edit Mode").
  • Adjust the window size as required.
  • To save these settings, switch to the other mode, when in View Mode change to Edit Mode or vice versa.
NOTE! Matching the text with the actual help text you might have noticed that it is slightly different and that I have modified it a bit to match today's commands. The guide still refers to version 2.xx and hasn't been updated since. This is quite common in freeware programs, since writing the help file is quite boring and time-consuming while writing code and adding new features is exciting.
67. To sum up, the program goes through the parts and commands in the Projects Parts List showing the parts until it finds a Step or Rotation Step where it stops and waits for your input: Going to the next Step command, the very last, the first or perform a giant leap though it's just a click for you. Use the entries in the Navigate menu, their shortcuts or the buttons in the Control bar. The Status bar will indicate the Step number you are watching. The behavior of the 3D view pane and some other settings can be adjusted
in ...
 
 
  Screenshot 26
 
  Brick 37x3
68. ... the View Mode tab of the MLCad Settings:
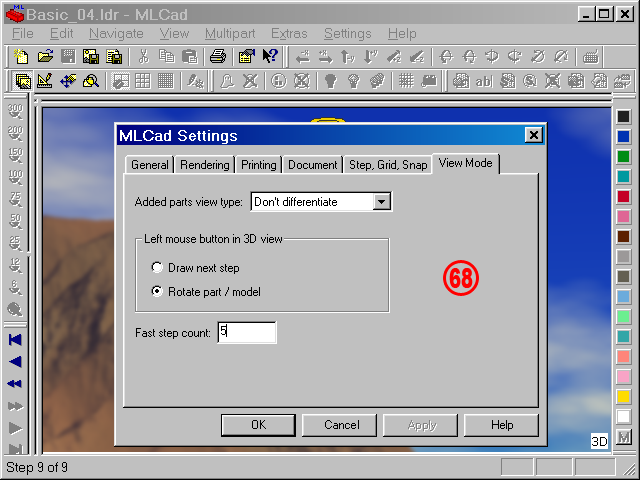
  • The Added parts view type drop down box offers four different modes how the newly added parts in a step are differentiate from the previous ones. It is really a matter of taste which mode you select but taking original LEGO instructions for reference you'll notice that modern instructions just add parts with no particular effect. Anyway if you want to give them a try here they are:

    Added Parts In BIs
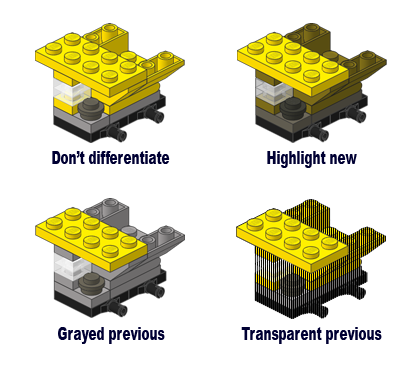
    • Don't differentiate turns the feature off, displaying the new parts like the rest.
    • Highlight new darkens the previous parts and leaves the added parts in full color. Obviously this has a minor effect on dark colors and you won't notice any difference on black parts. However transparent parts won't be darkened.
    • Grayed previous draws previous parts in gray and the added parts in the step with their real color. Transparent parts are not affected.
    • Transparent previous draws the parts in the previous steps transparent. However transparency will be simulated applying a grid of black lines over the solid colors. Do not expect the parts to become as transparent as parts with a real transparent color.

NOTE! This applies to the View Mode only and won't be recorded in the project file. Exporting the steps into single files via the File > Export... feature you'll always get all steps with all parts in full color and no, there is no way to access the Ignore previous part indication checkbox in the Export file(s) dialog – as it has been disabled in the source code. Therefore the only way to get those images out is MLCad's own image saver. In any case the last step of the project will show all parts with their real color.

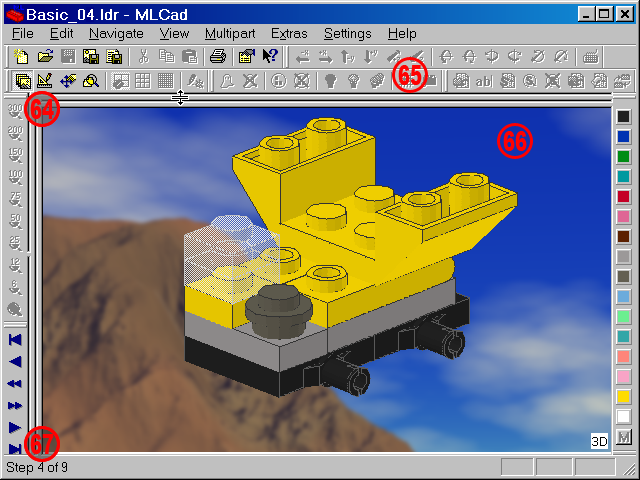
  • As already pointed out above, a click in the panes offering the orthogonal views (Front, Right, Top) will shift to the next building step. In the Left mouse button in 3D view box you might set how the 3D pane behaves in View Mode. Select the Draw next step radio-button if you are happy with MLCad's default view angle and want to lock the pane from accidental modifications. If you still seek full control of the view angle Rotate part/model is your choice.
  • The Fast step count value determines how many steps you are jumping forwards or backwards hitting the Fast Forward Fast Forward Button or Fast Backward Fast Backward Button buttons in the Control bar or selecting the corresponding entry in the Navigate menu.
top  
  Page <Previous 1 2 3 4 5 6 7 8 9 Next>  
Brick 1x4  
All content is provided as is, with no warranty stated or implied regarding the quality or accuracy of any content on or off this site.
LEGO® is a trademark of the LEGO Group of companies which does not sponsor, authorize or endorse this site.