| [ english ] | [ deutsch ] | [ italiano ] |
|
| Home > LDView |
|
||||
| Do you fancy thumbnails for your inventory or do you feel that the parts list of your model also deserves images of the single parts? One of the ways to render effortlessly a bunch of identical part images is batch-filing LDview. I, for example, wanted to make sure that all images in the parts-I-authored-gallery at the LDraw page look the same. Read on and find out how I accomplished this. This tutorial takes for granted that: |
||||
| LDView - http://ldview.sourceforge.net/ | ||||
| has been installed, is running smoothly and that you are at least a little familiar with it. The tutorial is based on version 4.1 | ||||
| First we have to define the look of the parts. This can be done directly in the command line using the statements documented in LDView's help file or through the GUI (Graphical User Interface). I prefer the latter because this method provides direct feedback how the image will ultimately look like. The settings will then be permanently stored in a set of preferences. To define a set follow these steps: | ||||
(The screenshot shows all menus and dialogs in one composed image). |
|
| 1. | Select Edit > Preferences... from the menu bar. This will pop up the LDView Preferences panel. | ||
| 2. | Select the different tabs (General, Geometry, Effects, ...) and ... | ||
| 3. | Enable or disable the various options. | ||
| 4. | Confirm your choice for every tab by clicking the Apply button before you move to the next one. The part's look will change accordingly. LDView's homepage http://ldview.sourceforge.net/ offers an image gallery showing the differences of the various settings. Check also the Help.html file in your LDView folder or select Help > Contents... from the menu bar for a detailed explanation. | ||
(The screenshot shows all menus and dialogs in one composed image).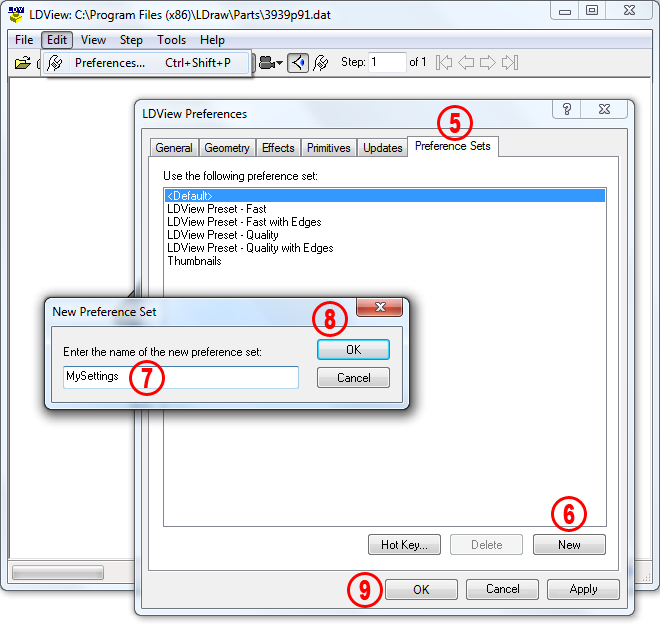 |
|
| 5. | Once you are happy with the overall look of your rendering activate the Preference Sets tab. This tab configures the available preference sets. | ||
| 6. | We will create a new set. Click the New button to open the New Preference Set dialog. | ||
| 7. | Enter a meaningful name of your choice in the Enter the name of the new preference set: box. This name will be reused later in the command line, so please make sure that your set name can be easily remembered. For this tutorial I will use MySettings. | ||
| 8. | Confirm your entry and exit the dialog by clicking OK. | ||
| 9. | Selecting MySettings in the list will cause LDView to use the preferences stored in our new defined set after you hit Apply. But it's usually a good idea to select another preference set once you've got your image generation set configured. Otherwise you tend to forget, and then you accidentally change the settings on it when you really meant to just change the settings for LDView as a viewer. Finally exit the LDView Preferences panel by selecting OK. | ||
| |
(The screenshot shows all menus and dialogs in one composed image).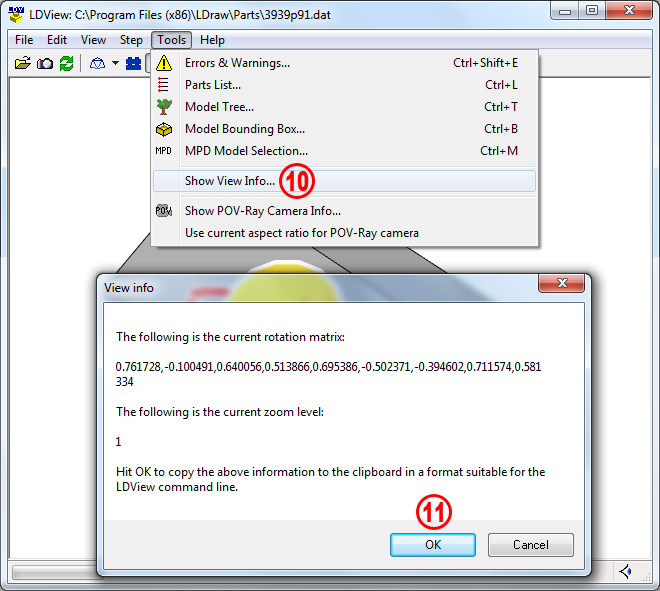 |
| 10. | If not clearly defined, the command line will render the images using LDView's default view angle and zoom level (camera distance). Be also aware that both settings will not be stored along with the other options in our preference sets, but have to be specifically set in the batch-file. LDView offers two commands to accomplish this: -DefaultMatrix and -DefaultLatLong. Users familiar with Lars Hassing's L3P http://www.hassings.dk/l3/l3p.html or Kevin Clague's LPub http://sourceforge.net/projects/lpub4/ programs will probably prefer the latter, I will use the rotation matrix 'cos LDView gives you an immediate visual feedback. Click the left mouse button and drag around to rotate the part/model. Click the right mouse button and move it up or down to zoom in or out. For special purposes LDView offers some preset view angles like Front, Left, Top ... Access them through View > Viewing Angles. The View > Reset View command will reset the view back to your setting until you use the Save Current as Default command to change the default viewing angle to something else. When you are happy with your viewing angle select Tools > Show View Info... from the menu bar. Please keep in mind that LDView's Show View Info... command doesn't work right if you have panned the image or moved around in Fly-through mode. |
||||||||
| 11. | Hitting OK copies this information to the clipboard in a format suitable for use with LDView on the command line. | ||||||||
| It's time to move to the nuts 'n' bolts of our batch-file. I will use Windows Notepad to write it but any suitable text editor will do the job. | |||||||||
NOTE! For a deeper understanding you also might download the batch-file used for this tutorial:
|
|||||||||
 |
|
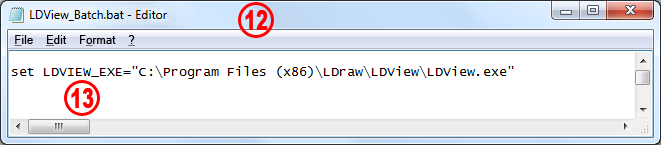
| 12. | Open a new file and label it with a meaningful name like LDView_Batch.bat. The important part is the file extension! Any other extension but .bat won't work. When creating the batch file and saving it the first time, it's worth noting that some text editors may try to change the extension based on the selected file type in the Save As... dialog box. So if Save as type is set to text, it might add a .txt onto the end of the filename, changing LDView_Batch.bat into LDView_Batch.bat.txt. Notepad dosn't do this, but it can be worked around in any text editor by enclosing the filename in double quotes: "LDView_Batch.bat". | ||
| 13. | Saving the file in any location different from LDView's root directory requires calling out LDView itself using a full path. We accomplish this with the set LDVIEW_EXE= command followed by the full path enclosed in double quotes. The path name supports blanks as well as extended ASCII characters used in German or Italian like: ä, ö, é ß ... | ||
| |
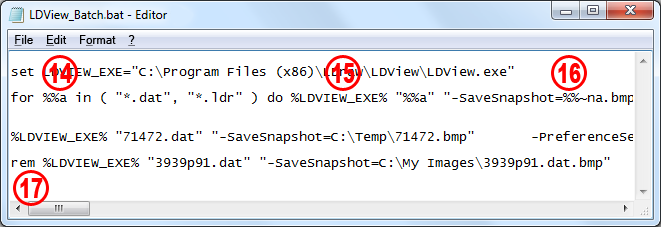 |
| 14. | To avoid problems with incorrect file paths, names, quotes and the like, we will store the batch file in the parts folder itself and define a variable %%a for all .dat and .ldr files. In this case you only have to pay attention to include the referenced subparts in a special subfolder named s. | ||
| 15. | The %LDVIEW_EXE% command will call LDView itself followed by the variable. Note that if your filename contains spaces, the entire filename must be enclosed in double quotes. (This is standard for any Windows command line with long filenames.) | ||
| 16. | Without the "-SaveSnapshot=%%~na.bmp" command no images would be created. The location of single images may differ from the parts directory. This has to be specified in an extra command line. The image's filename must have either .png or .bmp as its extension, and the appropriate image type will be created accordingly. Please note the syntax and the position of the double quotes when the path or filename contains blanks. | ||
| 17. | You might structure your file by adding blanks between the single commands but do NOT interrupt the rows manually. To exclude a file from execution you don't have to delete the entire line. Just add the rem statement in front. The batch-file will execute file by file and line by line, running a new instance of LDView for each file/line, which will create a snapshot and exit the program immediately afterwards. Depending on your video card, an LDView window may appear each time LDView is executed. When it reaches the end of the .bat file the command line window will also close. | ||
| |
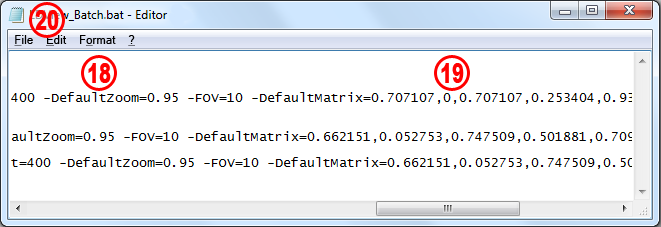 |
| 18. | Add all the desired commands LDView supports. Read the Help for a detailed explanation. I will list some basic setting I usually use: | ||
|
|||||||||||||||
| 19. | Paste the values you copied earlier to the Clipboard using the Show View Info in LDView to set the viewing angle. If you want to use a different angle for a special part just define a new 3D transformation matrix in LDView and repeat the copy 'n' paste procedure. You might also use the -DefaultLatLong=latitude,longitude command instead. | ||
| 20. | Finally save your batch-file in the desired folder. | ||
| To execute the file double click it or right click and select Open from the contextual menu. Remember that control may return to the command prompt before LDView has finished executing. So if your video card allows this to run without displaying a window, you won't have a good way of knowing when LDView has finished executing. Display mode will pop up the command line window showing the first line and subsequently open LDView. Don't worry if your window is all filled with the background color you set in the preferences, this is normal behavior. Image by image will by generated and stored in the defined folder and both windows will be ultimately closed. Please note that a wrong syntax will not generate any image and the LDView will stay open. You have to close it manually. If there are any other code lines the command line will continue its work. Depending on the performance of your computer some parts like my "Baseplate 32 x 32 with Craters" (3947.dat) - made of more than 5500 triangles - may take a long time to render. Don't get impatient - LDView is calculating. If you aren't happy with the result try changing some values either in the preference set or by adding new commands to the batch file. |
|
|||
| LEg GOdt | ||||
| Home | LDraw | MLCad | LSynth | LDView | Instructions | Wallpapers | Space | Western | Miscellaneous | About me | Sitemap | Contact | ||
| All content is provided as is, with no warranty stated or implied regarding the quality or accuracy of any content on or off this site. LEGO® is a trademark of the LEGO Group of companies which does not sponsor, authorize or endorse this site. |
||