| [ english ] | [ deutsch ] | [ italiano ] |
|
| Home > MLCad > Tutorial: Customizing MLCad | Last update: 23.02.2017 |
|
|||||||
| The tutorial is based on MLCad 3.5 and assumes that the program has been installed along with the LDraw parts library and is running smoothly. The MLCad.ini file tells the minifig generator in MLCad and LeoCAD as well as Bricksmith (the counterpart LDraw editor in the MAC world) which parts are available. In addition, the file defines the order of scanned folders during the launch of MLCad, which comes handy when dealing with unofficial LDraw parts and finally it rules the interaction with LSynth. If your installation doesn't come with a MLCad.ini file download it from the MLCad.ini tutorial page. |
|
||||||
| NOTE! A french translation of this tutorial can be found at J.C. Tchang's website: http://jc-tchang.philohome.com/manuel/mlcad_ini.htm. | |||||||
| The MLCad.ini file is a simple text file, editable in an editor or a word-processing program, and for MLCad 3.5 on Windows Vista or higher it is stored under C:\Users\<User name>\AppData\Roaming\Ing. Michael Lachmann\MLCad. <User name> is your user account name. The MLCad.ini is grouped in three sections: |
||
| Minifigure generator Scan order LSynth |
||
Minifigure generator |
||||||||||||
| This sections gives you full power over the selectable elements, but this also means that the chart has to be updated every time LDraw releases a new parts update containing minifig parts. You can add the new code by yourself, following the instruction below or just download the file from here, since Holly-Wood.it is the official maintainer of the .ini file.In case you wanna add unofficial or custom minifig parts there is one block per minifig element: Hats, Head, Body,... The block names are mandatory - if they are missing or wrong MLCad uses an internal default instead, which is different from the content in the file! Each element line has the following format: "<Display name>" "<DAT/LDR file name>" <Flags> <Matrix> <Offset> |
||||||||||||
|
||||||||||||
| In the example I'm gonna add one of the torso you can find on the page with the custom parts I've designed. It takes for grandet that you have already read the Easy rotation tutorial or checked out the scan order tutorial below and know how to install custom parts. | ||||||||||||
 |
|
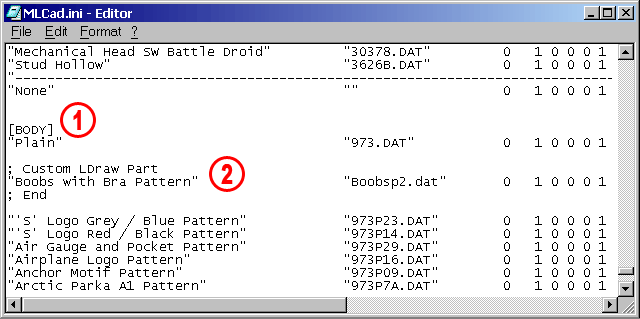
| 1. | Open the MLCad.ini file (you will find it in MLCad's root folder) in an editor or a word processing program and scroll down towards the end of the document 'til you come to the [BODY] section which administers the torsos. | ||
| 2. | Insert the data according to the format above. For the Boobsp2.dat it would look like this: "Boobs with Bra Pattern" "Boobsp2.dat" 0 1 0 0 0 1 0 0 0 1 0 0 0 In case your part doesn't require special rotation or positioning values like minifig accessories it is best to copy'n'paste an existing entry and substitute just the naming and part number. It is however good advice to flag custom inserts properly. MLCad encourages this and interprets lines beginning with ";" as comments, while empty lines are ignored. |
||
 |
|
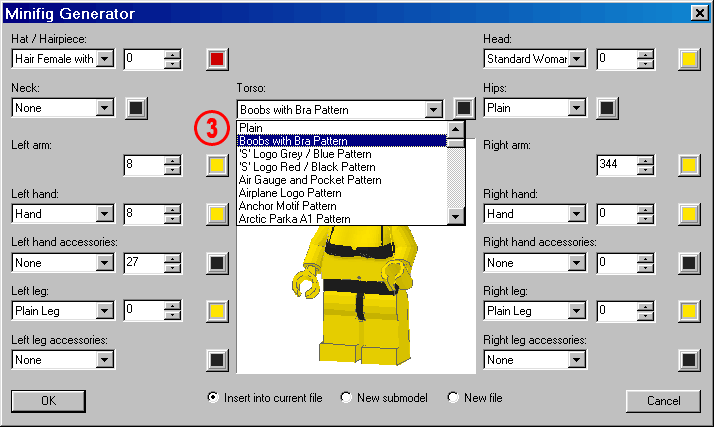
| 3. | Save the file. Opening the Minifig Generator the new part will be immediately available. | ||||
NOTE! You might keep the editor open after you have saved the new content. In fact MLCad deals just fine with an open .ini file. This behaviour is especially welcome when refineing the matrix by trail'n'error. All you have to do is:
|
|
||||
Scan order |
||||
This feature has been thought to include unofficial and custom parts into MLCad, without the need to mix them with the official LDraw parts in the \PARTS and \P folders. DAT files found in the scan will be included in the parts library and - depending on the flag - show up in the parts tree library and parts preview window. |
|
|||
LSynth |
||||||
| The sections tells MLCad the absolute path to LSynth and defines the available synthesis: %PATH = <path name> Example: %PATH = "C:\Programs\MLCad\LSynth" NOTE! The definition points to the path containing the bin\ folder and NOT the program lsynthcp - the console based synthesizer that reads in the DAT file and writes out a new DAT file with the synthesized parts. The quotes are important in case your path contains blanks. Following the path the section lists the available synthesis types. Since all synthesis are already listed you don't have to edit this portion. I'll show you the format just for completeness: <TITLE> = <COMMAND STRING> |
||||||
|
||||||
| Example: ;Axel, cable hose and string types LSynth knows about: FIBER_OPTIC_CABLE = SYNTH BEGIN FIBER_OPTIC_CABLE 16 FLEXIBLE_AXLE = SYNTH BEGIN FLEXIBLE_AXLE 16 ;Band, belt and tread types LSynth knows about: TECHNIC_TREAD = SYNTH BEGIN TECHNIC_TREAD Tangent Statement: INSIDE = SYNTH INSIDE NOTE! Regardless of the order of the statements in the .ini file the combo box will sort and list the synthesis types in alphabetical order. You may have also look at the LSynth/MLCad Tutorial for additional information. |
|
|||||
| LEg GOdt! |
| Home | LDraw | MLCad | LSynth | LDView | Instructions | Wallpapers | Space | Western | Miscellaneous | About me | Sitemap | Contact | ||||
| All content is provided as is, with no warranty stated or implied regarding the quality or accuracy of any content on or off this site. LEGO® is a trademark of the LEGO Group of companies which does not sponsor, authorize or endorse this site. |
||||