| [ english ] | [ deutsch ] |
|
| Home > MLCad > Tutorial: Advanced digital building - Page 1 of 5 | Last update: 18.02.2013 |
| Page 1 2 3 4 5 Next> |
|
||||||
| This tutorial will teach you advanced techniques to build digital models in MLCad. Furthermore it will show you tips and tricks and help with troubleshooting problems you might encounter. The tutorial is based on MLCad 3.4 and assumes that your feel comfortable with the program or that you have at least followed the basic tutorial on this site. Don't be discouraged by its length, you'll be rewarded with a deep insight into the MLCad LDraw editor. NOTE! Before we start there are some naming conventions you should be aware of: Since MLCad can be used on one hand for part authoring and the other to set up large layouts with different models; beside mosaics or fractal landscapes; I use the name "project" to describe the things you can make with the program. |
|
||||
 |
|||||
| You are going the build the minifig vignette above, getting to know the different advanced features of the program along the way. Detailed building instructions can be found in the section Building Instructions. | ||
| 1. | To speed up things please download the following file:
and unzip the contents to a temporary folder. At this point you should have the following files on your harddisk.
|
||||||
Minifig Generator |
||
(The screenshot shows all menus and dialogs in one composed image).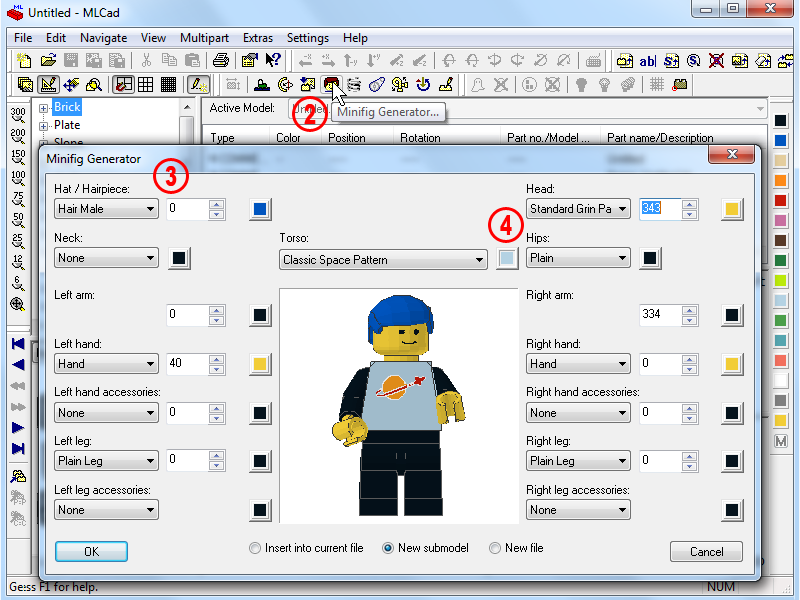 |
|
| 2. | Comparing the list of the extracted files with the final vignette you'll have surely noticed that the Minifig Boy is missing. Launch MLCad if you haven't already done and make sure that Grid Coarse  and Draw To Selection Only and Draw To Selection Only |
||||
| 3. | Select the parts needed from the drop-down menus. NOTE! A major disadvantage is that the categories are all textual and lack a visual preview until you have finally selected a part. Since you cannot switch back and forth between the generator and the Parts Tree it is good advice to browse the Parts Tree or Parts Preview prior to firing up the Minifig Generator and jot down the description of the parts you're gonna use. The fastest way to do this is selecting the Minifig category from the drop-down menu in the Parts Preview, browsing through the parts and hovering with the cursor over the part whose description you want to know: The part's number and description will show up in the Status bar below. NOTE! The content in the drop-down menu depends on the MLCad.ini file in MLCad's root folder. For a deeper insight on how to modify the entries displayed here, please read the tutorial to customize MLCad a bit through the MLCad.ini file. Be sure to put some effort into the pose while you’re in the Minifig Generator. Once the minifig has been added to your project you cannot come back or reload your figure into the generator again to make adjustments. Rotating a hand holding a weapon can be done in the wink of an eye as long as you are working within the generator's environment, but becomes a real pain when you want to do it via the Building Area. |
||||
| 4. | On the contrary no careful choices are required for the color selection. Just leave them as they are by default. It is usually much faster changing the color afterward using MLCad's Color bar than calling up the color dialog for every single part in the generator. This is most true for multiple parts of the same color such as arms or legs. It is a good rule to fix the color only for patterned parts if you are unsure how the pattern will look in relationship with the color. | ||||
 |
(The screenshot shows all menus and dialogs in one composed image).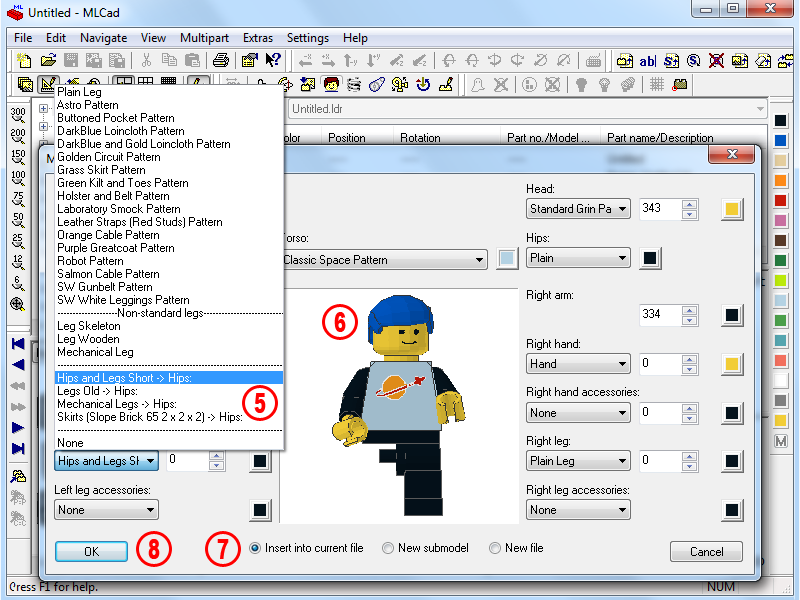 |
||
| 5. | In the Left leg:, Right leg: drop down menus, selecting Hips and Leg Short -> Hips: will eliminate the leg parts altogether. It further reminds you that you have to set Hips and Legs Short in the Hips: category. NOTE! You might wonder why the labels for the drop-down menus of the legs and arms are apparently inverted. When I pointed this out to Michael Lachman, the author of the program years ago, the explanation I've got was: “The label is not referring to the right and left side of the minifig; it's linked to your point of view. Looking at yourself in the mirror you wouldn't refer to your right hand as left hand, would you?” Well, minifigs are definitely our alter ego, in the LEGO world … kind of a mirrored universe ... so I guess he is right! |
|
|||
| 6. | Hover over the Preview area, hold down the left mouse button and move the mouse to rotate the minifig. Carefully check the parts and pose selected and remember that it will be much harder to apply any modifications once the generator has been closed. | ||||
| 7. | Since we started with an empty project select Insert into current file. The difference between the three options is as follows:
|
||||
| 8. | Hit the OK button to close the dialog. The parts are added to the Project Parts List from head to toe with the origin located at the base of the stud atop the torso. Recolor the little blue-haired punk or leave it as you see fit. Save the project in your temporary folder and name the file Minifig Boy.ldr. NOTE! The Undo function will reset your project back to the state it was in before you launched the generator. |
||||
(The screenshot shows all menus and dialogs in one composed image). |
|||
 |
9. | Load the Mini Dumper Truck.ldr from the temporary folder. The Model already comes with all the building steps which have been added in the basic tutorial. Browse the Project Parts List and select the 4871 - Slope Brick 45 4 x 2 Double Inverted with Open Center before the two transparent 3024 - Plate 1x1. | ||
| 10. | Add a Buffer Exchange |
|||
| 11. | MLCad allows to save up to 26 display states during the View Mode and to retrieve them at a later moment. Selecting A from the drop-down box and hitting OK will save the display state up to this point in an internal memory named A. |
|
| Page 1 2 3 4 5 Next> |
|
||||
 |
Home | LDraw | MLCad | LSynth | LDView | Instructions | Wallpapers | Space | Western | Miscellaneous | About me | Sitemap | Contact |  |
||
| All content is provided as is, with no warranty stated or implied regarding the quality or accuracy of any content on or off this site. LEGO® is a trademark of the LEGO Group of companies which does not sponsor, authorize or endorse this site. |
||||

