| [ english ] | [ deutsch ] |
|
| Home > MLCad > Tutorial: Advanced digital building - Page 4 of 5 |
| Page <Previous 1 2 3 4 5 Next> |
(The screenshot shows all menus and dialogs in one composed image).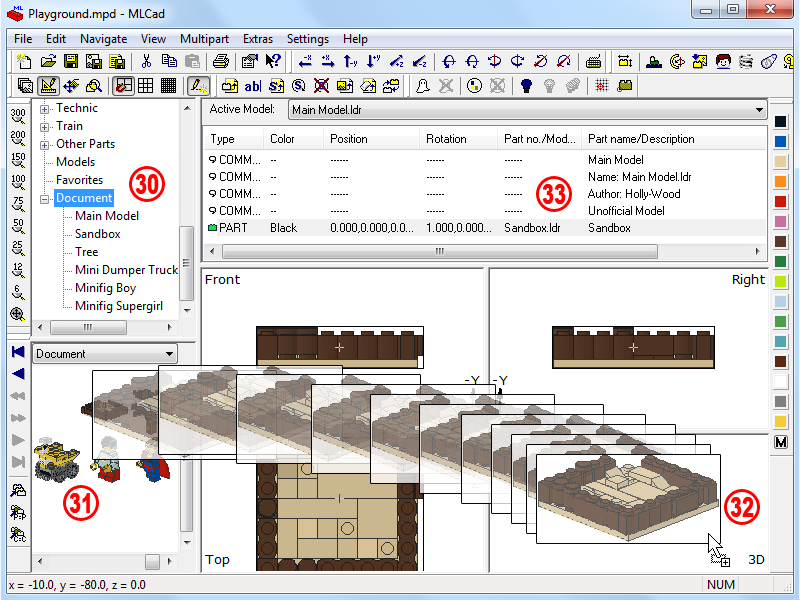 |
|
| 30. | Browse the Parts Tree towards the bottom until the Document folder becomes visible. Expanding the folder you will see the same structure as in the Active Model: list and ... | ||||
| 31. |
… also the Parts Preview pane will render thumbnails of the imported models. The folder didn't show anything as long as you were working on a single project now it is filled with your models, which can be used just like a normal LDraw part. This is the true power of an MPD: You are able to mix submodels with ordinary parts at the same level with the advantage that the submodels are still accessible for modification. NOTE! You might wonder why there is an empty space in the top left-hand corner? It's the thumbnail representing the Main Model file. The Parts Preview always renders the content of the respective file. Since our container file Main Model still doesn't contain any submodel there is nothing that could be rendered. Adding submodels to your scene will change the thumbnail. |
||||
| 32. | Drag 'n' drop the Sandbox.ldr to the 3D pane to get it an origin at 0, 0, 0 – check the figures in the Statusbar. Still no thumbnail for the Main Model submodel in the Parts Preview pane? View > Refresh the visualization. | ||||
| 33. | Also the Parts Project List will file the new addition. Have an eye on the Part no./Model name and the Part name/Description. More important is the Color column. Based on the setting in Settings > General > Change... > Document > Color for new object > Default color the very first model will be colored accordingly. You will argue that the sandbox's color hasn't changed a single bit from what you're seeing in the Building Area! This is because all parts have already been colored in the submodel, so there is no room for a new color. Remember: in an MPD project submodels behave like parts! It's the same as with patterned LDraw parts. You cannot change the color of the pattern 'cos the color has been hardcoded into the pattern. Drag 'n' drop the Tree.ldr, where some of the leave parts have been assigned the LDraw Main color 16. With the settings I use the tree earns the color from the previous model and the leaves come in pitch black. Just use the Color bar to get them some fresh spring green or an Indian summer red. |
||||
(The screenshot shows all menus and dialogs in one composed image).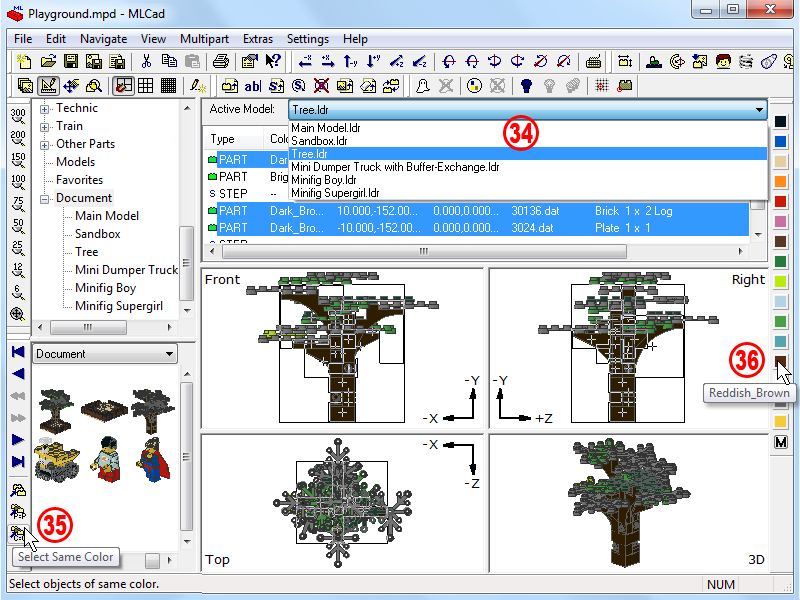 |
|
| 34. | The trunk is a bit too dark and some leaves with the hardcoded shades of green stick out from the autumn red? Change it! Make the Tree.ldr the Active model:. | ||
| 35. | Select a part with the color you wanna change and hit the Select Same Color button |
||
| 36. | Assign them a new color. Change also the leaves if you like. Reactivating the Main Model model you'll see that the changes have also applied to the Tree in the container model. | ||
 |
|||
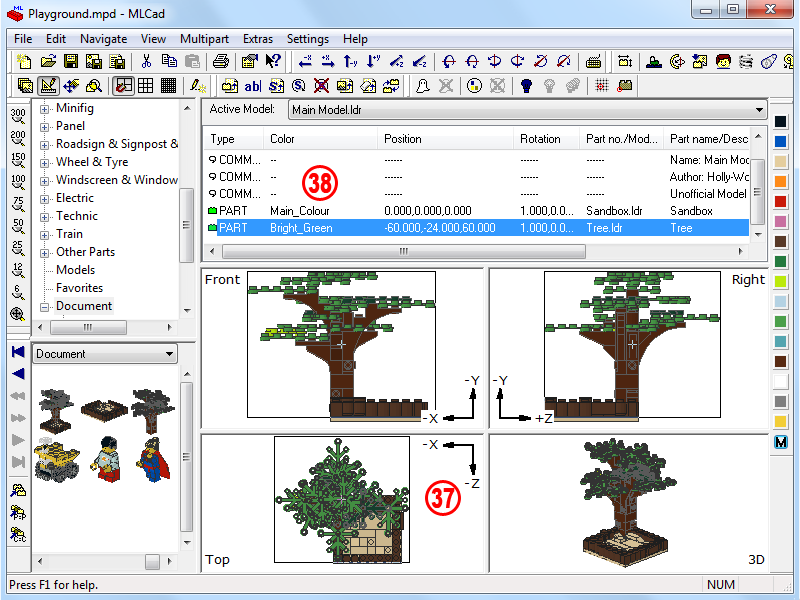
| 37. | Position the Tree and ... | ||||
| 38. | … assign LDraw main color 16 to the Sandbox. Playing around with submodels and colors sometimes things get messy and you wonder why a model suddenly shows up in a wrong color. It won't happen in MLCad with its old-fashioned rendering engine though.
Things change as soon as you move to a OpenGL viewer such as LDView. For instance color the Sandbox in the Main Model with LDraw color Chrome_Silver 383, save and view the project in LDView with Specular highlight turned on in the Edit > Preferences... > Effects > Lighting box. If you paint all submodels in the Main Model with a neutral color, better non-color as LDraw main color 16 is, it eliminates an extra layer of paint that is not showing up at this time, but might, if you start copy 'n' paste models or parts around in your project too. |
||||
Scaling |
||
| Next thing we are going to do is possible only in the virtual world, but it adds a nice touch to the vignette: Scaling! | ||
 |
(The screenshot shows all menus and dialogs in one composed image).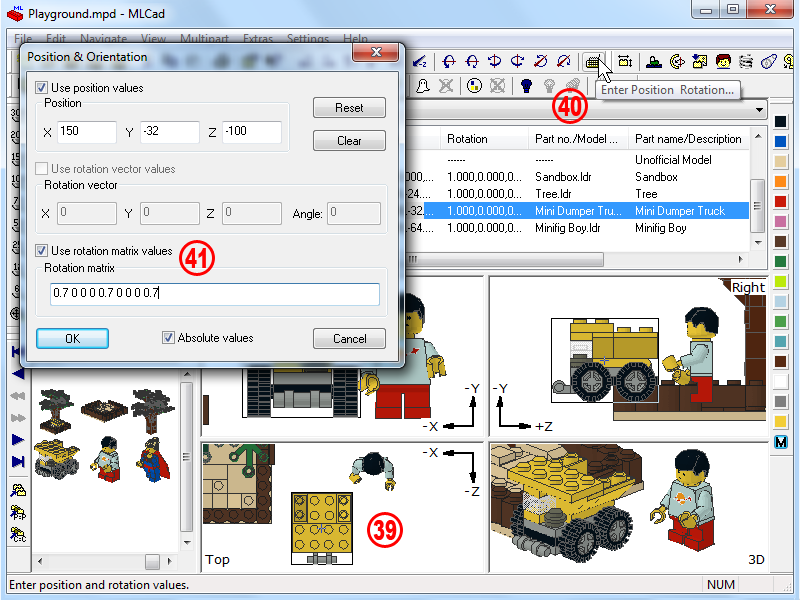 |
||
| 39. | Drag the Mini Dumper Truck with Buffer-Exchange and Minifig Boy into the Main Model and place them in a way to clearly see them – we don't need to position them properly for now. |
|
|||
| 40. | Select the Mini Dumper Truck and hit the Keyboard button |
||||
| 41. | Tick the Use rotation matrix values checkbox in the popping up dialog and substitute all 1 with 0.7 in order to get the following figures: 0.7 0 0 0 0.7 0 0 0 0.7 Hitting the OK button makes the truck toy size in comparison to the boy. In fact it got reduced to 70% of its normal size. A simple rule for scaling is: the 1 in the rotation matrix stands for 100%, 0.5 would scale the submodel to 50%, 0.3 would reduce it to one third of its initial size. The rest is mathematics. Also because the whole things is driven by a “top left 3x3 matrix of a standard 4x4 homogeneous transformation matrix“. When I have to give advice how to deal with this monster I love quoting from the “The Matrix” movie: “Unfortunately, no one can be told what the Matrix is. You have to see it for yourself.” - and play with it I'd add. There is lot of room for “trial and error”. The only rule that you should take by heart when messing around with the transformation matrix is: Don't rotate at strange angles (where “strange” stands for angles which are not multiples of 90°) before scaling, unless you're really good at maths. Again: add, scale, rotate and position. If things start looking distorted just insert a: 1 0 0 0 1 0 0 0 1 to set back everything to default. At the end of all playing your project should look like this: |
||||
|
|||||||||||||||||||||||||||||
| Note how the 0.7 0 0 0 0.7 0 0 0 0.7 has become a 0.606 0 -0.35 0 0.7 0 0.35 0 0.606 after rotating the dumper truck just a little bit. | |||
Custom and unofficial parts |
||
(The screenshot shows all menus and dialogs in one composed image).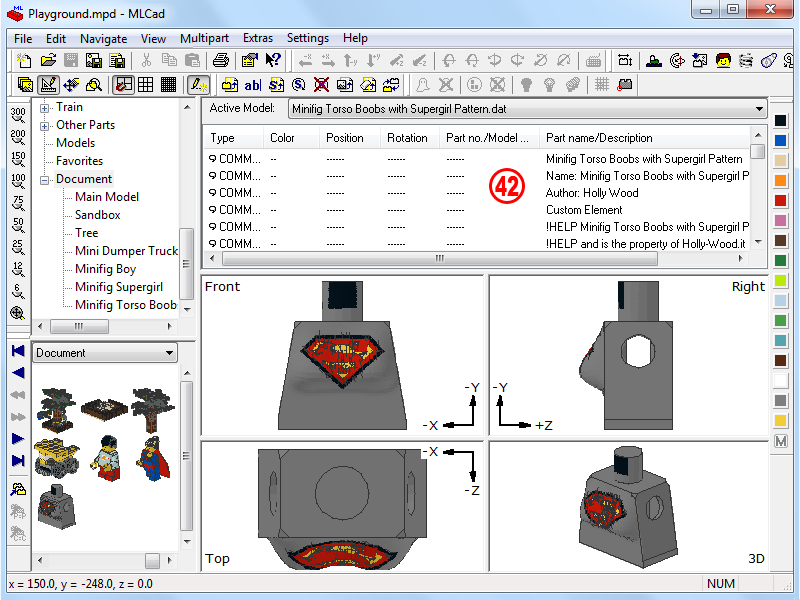 |
|
| 42. | Ready for the final rush? Looking closer at the Minifig Supergirl.ldr submodel you'll have surely noticed a part you've never came across before. In fact I designed the Minifig Torso Boobs with Supergirl Pattern specifically for this tutorial.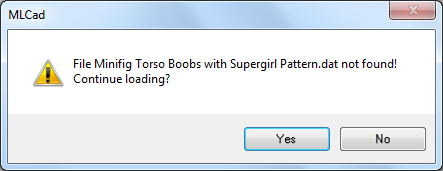 NOTE! Typically MLCad would complain if it had to load a part which has no correspondent in the LDraw Parts Library with the above message ... |
|
| Page <Previous 1 2 3 4 5 Next> |
|
||||
 |
Home | LDraw | MLCad | LSynth | LDView | Instructions | Wallpapers | Space | Western | Miscellaneous | About me | Sitemap | Contact |  |
||
| All content is provided as is, with no warranty stated or implied regarding the quality or accuracy of any content on or off this site. LEGO® is a trademark of the LEGO Group of companies which does not sponsor, authorize or endorse this site. |
||||

