| Home > LDraw > Tutorial: How to make a pattern |
|
|||||
| Before LD Pattern Creator - http://sourceforge.net/p/patterncreator/home/Home/ (a LDraw specific program to create patterns in the wink of an eye) became available, author a pattern in LDraw was a major hassle. Read below which technique I developed to author most of the patterned parts you can find at the authored-parts-page. |
| This article was published in BrickJournal, Issue 9, Volume 2 • Jan./Feb. 2010 |
|||
 |
 |
||
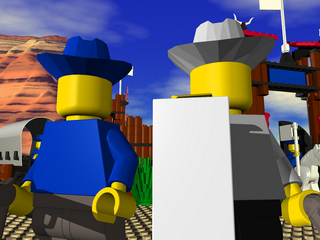
| [A western scene using exclusively non-patterned parts or pieces with the printing removed.] |
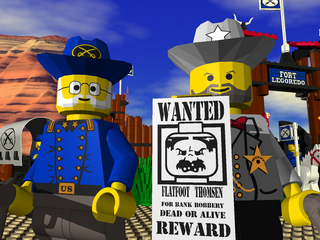
[The same scene with patterns. Some parts like the canvas or the horse do not exist without a pattern.] |
||
| The “Standard Grin Pattern”, the “Classic Space Logo”—some patterns are as iconic as the brick shape itself. Having their digital counterparts also available in the LDraw system calls for special authoring techniques. Here's an insight into how to author patterns for LDraw parts. | ||
| To be perfectly honest: Authoring LDraw patterns are a waste of time! Along with curved surfaces called free forms, which are hard to measure and therefore re-engineer, patterns are usually the last thing a new [LDraw] parts author wants to tackle. Not only because of their complexity, especially when they are applied to a curved surface, but also because they do not add a new valuable brick shape to the LDraw library. On the other hand, a scene without a patterned torso or some stickers would miss a crucial detail: character! My way The process I’m going to describe was formulated back in 2002 when I authored my first pattern: the ”Classic Space Logo“. It took quite a bit to perfect the way I transform a picture into LDraw code and other part authors might consider it laborious, but I cannot imagine doing patterns like ‘3754p01 - Brick 1 x 6 x 5 with Rocket Launch Pattern’ or ‘3069bpw0 - Tile 1 x 2 with “Wanted - Flatfoot Thomsen” Pattern’ in a different way. Step one: “Scan 2 vector graphics” To get some data I can later elaborate on in an editor, I usually take a 600 or 800 dpi high resolution scan to be used as reference in a vector graphics program where I re-draw the outlines of the different colors. It gives me a first overview, makes me aware of critical sections I have to take care of once I edit the pattern in my CAD program and also gives me the chance to correct gaps or offsets caused by print misalignments during the different color runs. The caveat is that I cannot create some sort of wireframe like the one you can find in a coloring book and fill in the color. I have to make sure that every path is closed, that there are no overlaps and more important that the single shapes do not have holes. The simplest way to achieve this is to separate each color into a separate layer and export every layer as a stand-alone object. |
||
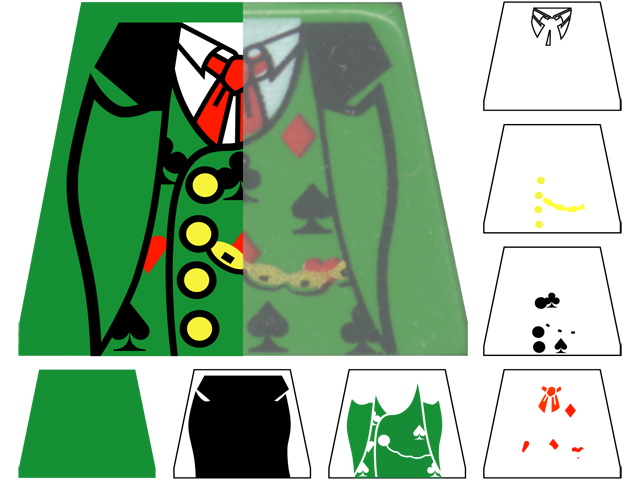 [The single color layers build the final pattern] |
||||||||
| Since the LDraw specification only knows about lines, triangles and quadrilaterals, and nothing about complex polygons or meandering paths called “splines” in CAD-jargon, the output of the vector graphics program has to be converted. During conversion the piecewise polynomial curves are analyzed and substituted with portions of straight lines trying to simulate the path as close as possible and finally turning it into a mesh of rough triangles (the technical term for this is tessellation). Step two: “Triangle 2 Triangle” Time to start up “Monzoom 3D”. This modeler and raytracing program was once developed as “bookware” for the Commodore Amiga computer back in the 80s and its development was stopped more than 10 years ago, shortly after it was ported to the Windows platform. Monzoom knows nothing about all the fancy manipulator tools you can find in today’s state-of-the-art CAD programs, but it still builds everything in its virtual world with triangles and is therefore a perfect tool to manipulate LDraw shapes. |
||||||||
 [Screenshot of Monzoom showing the red color layer after the splines have been tessellated] |
||||||||
| After loading the single layers into Monzoom I’m faced with two hassles. First off, there is still too much detail. Splines with many nodes require much more tiny straight lines to simulate a curve than an almost straight section. There has to be a balance between enough detail to still reassemble a shape and the number of triangles required to do the job. Despite today’s quad core processors and cheap memory, the so-called “polycount” is still an issue. Consider that though the LDraw world uses 16 triangles to simulate a perfect disk the number of triangles sum up quickly to 818 in a simple 2x4 brick. It will have a massive infl uence on the rendering time if I use thousands of triangles to build the above pattern for the gambler torso or the 768 triangles which make it up now. Second, since I do not have a wireframe, but different layers, I have to identify which vertices belong to a speci fic color and where do I have to connect them. | ||||||||
 |
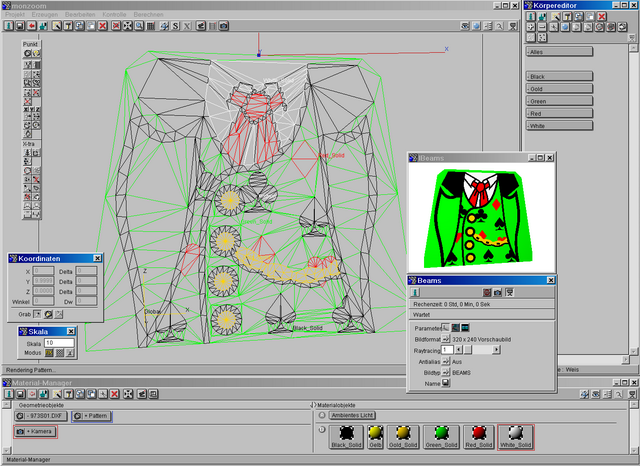 [Screenshot of Monzoom with the final fully-colored wireframe and a test render in the thumbnail. Note how the number of vertices reassembling the red bow tie have been dramatically reduced in the thumbnail. Note how the number of vertices reassembling the red bow tie have been dramatically reduced] |
|||||||
| It can take several weeks deleting obsolete vertices and triangles, rebuilding them, and grouping them into colors. In addition I try to identify sections which can later be substituted by so-called LDraw primitives, pieces which already reassemble a certain shape–like discs or half-discs–and therefore don’t have to be re-designed a second time. At the end of many mouse clicks I get a wireframe which already looks like the final pattern but comes in Monzoom’s own file format. You cannot expect a 40 dollar program to support many other 3D file formats; actually it exports to just one: POV-Ray. Luckily the POV-Ray format has much in common with the LDraw file format. Step three: Pov 2 Dat For the final rush I use LDDP - LDraw Design Pad, a text editor for LDraw files. After a bit of “Search’n’Replace”, the POV-Ray output has been turned into LDraw code lines. What follows is a back and forth between programs like MLCad (to sort and order the pattern-building triangles into color groups or do primitive-substitution) and LDDP (to further sand the code). |
||||||||
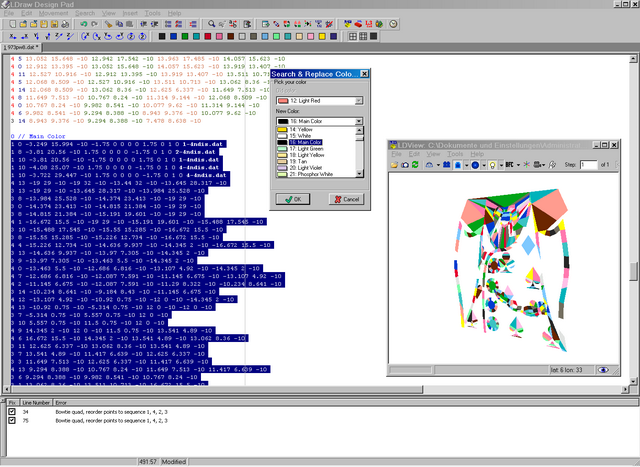 [Screenshot of LDDP polling to the external parts viewer LDView to get a visual feedback while running through the code line by line. The triangles and quads have been assigned a random color to better distinguish them] |
 |
|||||||
| According to the LDraw spec 1.0.0, the decimal numbers have to be trimmed to three digits after the decimal place. Where possible, the triangles have to be joined in quadrilaterals, and those have to be checked to verify that the sequence of the vertices is correct. All triangles must have the same clockwise or counterclockwise winding (which in LDraw jargon is called “BFCing”). Comments should be added to document at least a bit of the code. Last but not least, I have to make sure that my pattern fits the blank brick and also a test rendering in POV-Ray doesn’t hurt to spot undiscovered errors. Before I’m going to upload the patterned brick to the LDraw Parts Tracker for reviewing and certi fication I edit the header in DatHeader and add keywords and other data required for an of ficial parts header. Some of my patterned bricks even come with a branding. Search your parts library for the text criteria www.hollywood.it or visit my website and have a look at the patterns I have authored so far. Links to the tools and their documentation: |
|
| |
||
| Home | LDraw | MLCad | LSynth | LDView | Instructions | Wallpapers | Space | Western | Miscellaneous | About me | Sitemap | Contact | ||
| All content is provided as is, with no warranty stated or implied regarding the quality or accuracy of any content on or off this site. LEGO® is a trademark of the LEGO Group of companies which does not sponsor, authorize or endorse this site. |
||