| [ english ] | [ deutsch ] | [ italiano ] |
|
| Home > MLCad > Tutorial: Easy rotation |
 |
|||||
|
|||||
| Rotating a group of parts in MLCad using its rotation point feature can be quite laborious: you have to enter coordinates, names, might deal with different points or tweak the exact position on-screen... | |||||
(The screenshot shows all menus and dialogs in one composed image).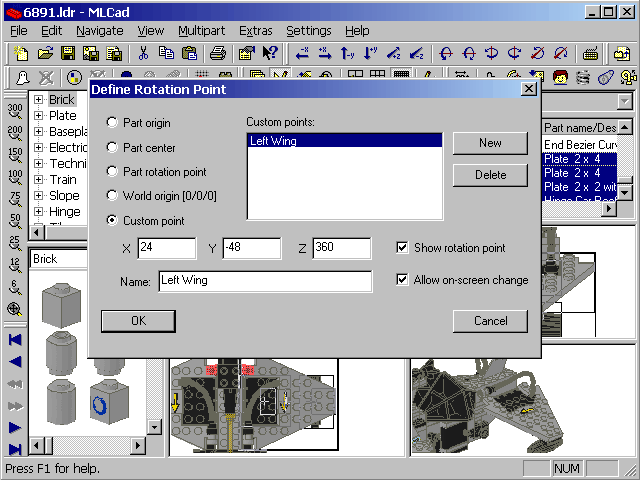 |
|
| This tutorial will show you an alternative, more visual approach to rotate a group of parts around a common self-defined rotation point. We take advantage of MLCad's behavior, which sets the rotation point of the first selected part as rotation point for the rest of the selection. This tutorial is based on MLCad 3.11, takes for granted that the program is running smoothly and that you are a little familiar with it. First we have to tweak MLCad a little bit - this has to be done only once and you might also learn some interesting things down the way ;-) Download the helper part I created for the purpose:
There are two ways to add new parts to your library: a fast one and a little trickier alternative, but the latter has the benefit that on the long run your LDraw system will keep better organized. It takes advantage of the current move of several core programs of the LDraw system towards the support of custom part folders. The inpatient unpack the helper and store it in the \PARTS folder. To include the helper in MLCad's parts library tree you have to update the Parts.lst file. Launch MLCad: |
||||||||||||||
(The screenshot shows all menus and dialogs in one composed image).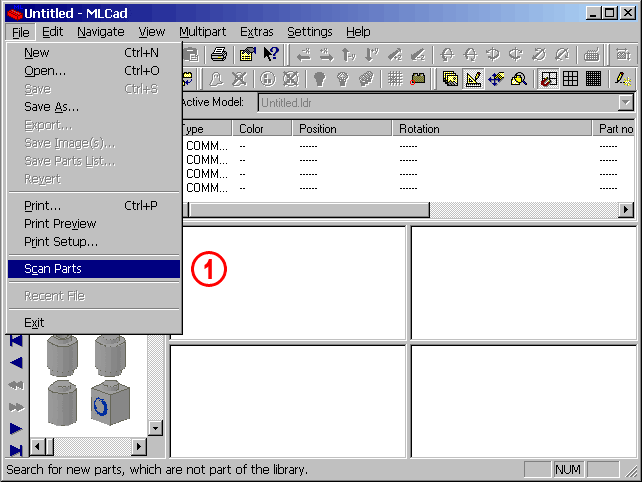 |
|||
| 1. | Select the File menu and then the Scan parts tab (File > Scan parts). MLCad will search for new parts and asking you if you want to add them to its part library. Experienced user might rerun Mklist.exe from the command line. | ||
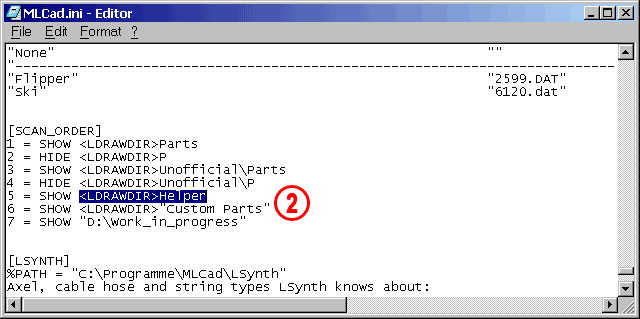
| The well organized among you should at least work with MLCad 3.10 or higher, create a special folder in the MLCad directory named "Helper" and save the helper part there. To tell MLCad to scan this folder at start-up, just open the MLCad.ini file in an editor or a word processing program and scroll down towards the end of the document 'til it reads: NOTE! The MLCad.ini file can be found in MLCad's root folder. For the event you've installed a version which has been shipped without the file or you wanna have the latest version you can donwload it from my MLCad.ini tutorial page. |
|||
 |
||
| 2. | Add SHOW <LDRAWDIR>Helper under [SCAN_ORDER]. In case MLCad is unable to read the <LDRAWDIR> keyword indicating relative paths you have to either define LDRAWDIR as environmental variable in your OS or omit the keyword altogether and define the absolute path (if your filename contains spaces, the entire filename must be enclosed in double quotes which is standard for any Windows command line with long filenames). With the library stored in C:\Programs\LDraw\ the code would be: 5 = SHOW "C:\Programs\LDraw\Helper" NOTE! The screenshot you are looking at is just a copy of my personal configuration. Don't worry if some entries do not match yours. Note also that models containing custom and unofficial parts as well as helpers can't be easily shared with other people and might not work properly in applications like LPub. In this case Her.dat should be "inlined" (check out the tutorial and reference pages at www.LDraw.org for a deeper insight). |
|
|||||||
| Being the helper named "Helper – Easy Rotation" MLCad will list it under "Other Parts\H" and it would require a lot of clicks down the Parts Tree to get access. Therefore we will create a new sub-directory in the Parts Tree. | |||||||||
(The screenshot shows all menus and dialogs in one composed image).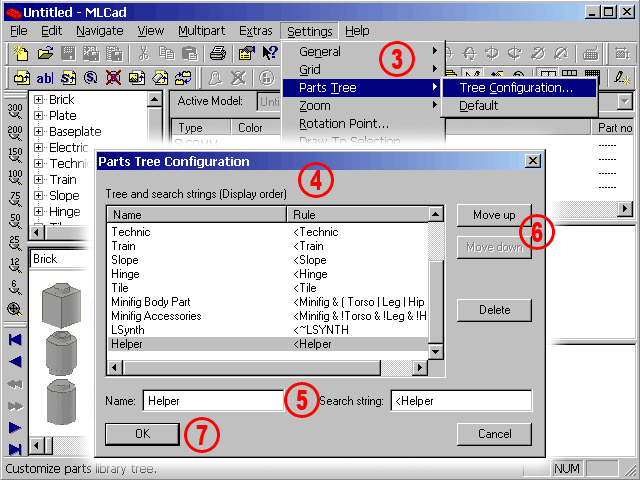 |
|
| 3. | Select Settings > Parts Tree > Tree Configuration... | ||||
| 4. | This will pop up the Parts Tree Configuration dialog. | ||||
| 5. | Enter the following two statements in the fields at the bottom of the dialog: Name: Helper Search string: <Helper |
||||
| 6. | You might change the order of the sub-directories by clicking the Move Up or Move Down buttons. | ||||
| 7. | Confirm your insertion and exit the Parts Tree Configuration dialog by selecting OK. | ||||
| All parts containing the word "Helper" as first word in their title will now be collected in this new sub-directory. In case you have already downloaded other helpers from my LDraw page you will also find them there. |
|
||||
| MLCad is now ready for "Easy Rotation". To show the single steps I will use a little dumper truck, containing some hinge parts. Additionally you might download the .ldr file I used for this tutorial or rebuild it yourself using the detailed building instruction on the building instruction page: | ||||||||||||||
|
||||||||||||||
| Open the LDraw file Dumper.ldr in MLCad and zoom in until the rear of the dumper is well visible in the panes. I surely don't have to remind you that the fastest way to zoom is holding down the SHIFT key plus the CTRL key and dragging the mouse up or down (SHIFT+CTRL+Mouse), while SHIFT+Mouse will perform a pan. | ||||||||||||||
(The screenshot shows all menus and dialogs in one composed image).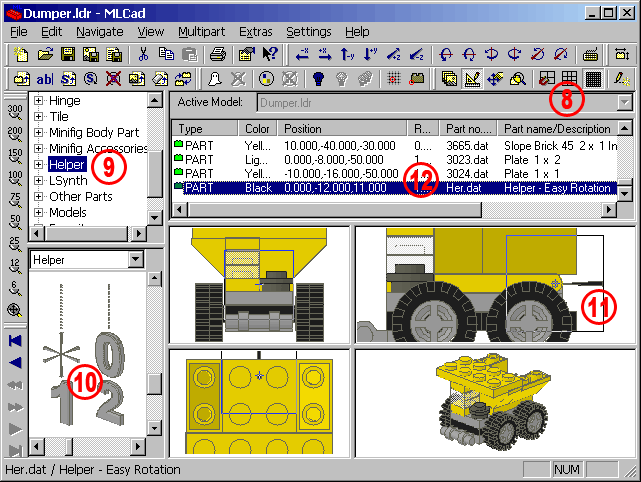 |
||||||||||
| 8. | To ease the positioning of the helper part we will use the finest grid. Click the Grid fine button |
||||||||
| 9. | Click the Helper sub-directory in the Parts Tree. | ||||||||
| 10. | This will show all available helpers in the Parts Preview pane. If you have downloaded the other helpers from my LDraw page as well, you have to pull down the slider a little bit 'unil the Helper – Easy Rotation becomes visible. | ||||||||
| 11. | Drag the Her.dat – Helper Easy Rotation part into one of the panes. Remember that depending on the settings for the position of newly inserted parts in the Document tab – accessible via Settings > General > Change... > Document > Position of new object - the helper part will may not be centered but takes some coordinates from the previous selected part. Therefore you will have to reposition the helper in at least two different panes. | ||||||||
| 12. | For the tutorial we will use x = 0, y = -12, z = 11. These coordinates make sure that the helper is set right in the middle where the hinge parts meet our rotation center. Please note also that it is unimportant where the helper comes to lay in the Project Parts List and which part was the last selected. | ||||||||
 |
|
 |
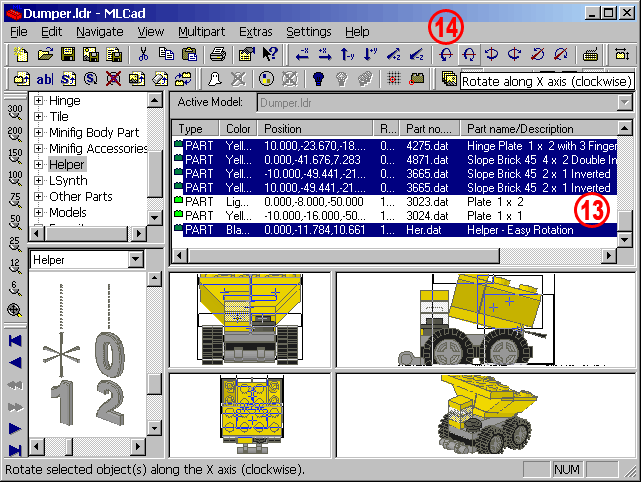
13. | The following procedure is crucial! To take advantage of MLCad's behavior, which sets the rotation point of the first selected part as rotation point for the rest of the selection, you have to select the helper part first. After you have selected the part Her.dat – Helper Easy Rotation hold down the CTRL key and click the following parts belonging to the dumper's container:
NOTE! You may select them in the panes but the Project Parts List will give you a better overview – besides the fact that it is difficult to select a part when it is hidden by others. |
|||||||||||||||||||||||||||||
| 14. | Click the Rotate along x axis (clockwise) button Doing a little practice rotating parts will be a piece of cake from now on. What follows are nothing more than some hints to ease your work even more. |
||||||||||||||||||||||||||||||
| Browsing the Project Parts List of my Dumper.ldr you will notice that the parts are all messed up and do not follow a logical building order. This has been done intentionally to reflect a real situation where it's unlikely that all parts belonging to a selection are sorted or grouped together – especially when using CAD as a building and design tool rather than making an instruction out of an existing model. Though it is not necessary it's good advice to collect all parts to be rotated in on place - say at the bottom of the project by copy'n'paste, or group them under a meaningful name. I'll show you the latter. | |||||||||||||||||||||||||||||||
(The screenshot shows all menus and dialogs in one composed image).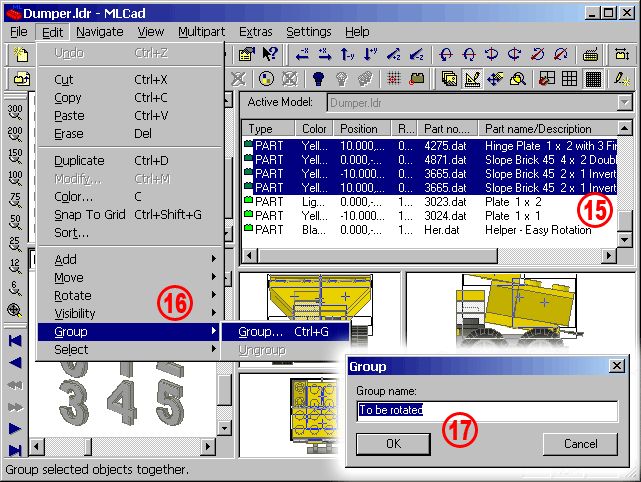 |
|
| 15. | Select the container parts in the Project Parts List, but NOT the helper. | ||||
| 16. | Select Edit > Group > Group... (or click the corresponding Group... button |
||||
| 17. | This will pop up the Group dialog. Click in the Group name: box, type in a descriptive name and press the OK button. Though every letter or symbol is allowed inpatient folks will just confirm the default Group name but it is wise to use proper naming. "Container", "Cockpit", "Upper wing right side" will tell you and other people you might share your files with, much more than "Group name", "Group name1"... | ||||
(The screenshot shows all menus and dialogs in one composed image).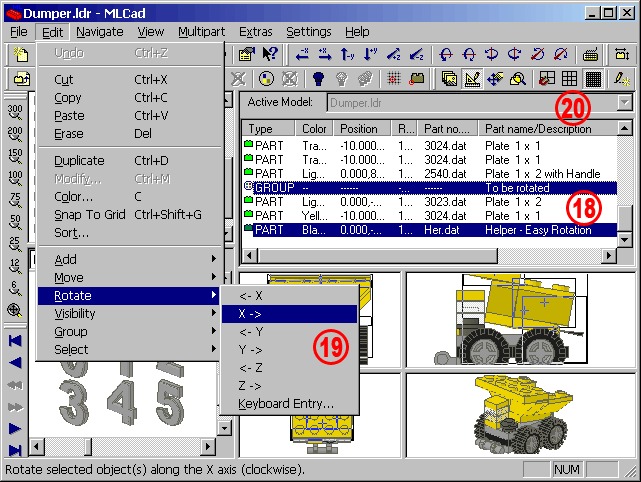 |
|
| 18. | Select the helper part and add the group to the selection. | ||||
| 19. | Instead of pushing the toolbar button we will perform rotation by going the alternative way through Edit > Rotate > X-> or using the shortcut Ctrl+Down Arrow. | ||||
| 20. | The rotation angle as well as the grid scale – called Step units - depend on the settings. Most of the time MLCad's default values for the fine grid will be sufficient for your daily work. In case you need very specific angles or even finer step units to position your helper part you have to change the settings. | ||||
(The screenshot shows all menus and dialogs in one composed image). |
|||||
| 21. | Select Settings > General > Change... This will pop up the MLCad Settings dialog. Select the Step, Grid, Snap tab. | ||||
| 22. | The default step units for Grid fine are 1 LDU (LDraw Units). To, for example, half the fine grid just type in 0.5 in the X, Y and Z Step units: boxes and confirm your choice by hitting OK. Values smaller than 0.001 don't make much sense. LDraw Parts are designed down to three digits and details smaller than 1 LDU are usually ignored in the re-engineering process. Therefore it is almost impossible that your helper needs an even finer grid to meet the hypothetical rotation center. | ||||
| 23. | The default rotation angle is set to 5 degrees. Substitute this value with 26.565 to match the angel of a Slope Brick 33, use 18.435 for Slope Bricks 18 or digit 1 if you want rotate the selection for just 1 degree every time you click one of the rotation buttons in the Transformationbar. To exit the dialog press OK. |
|
|||
| LEg GOdt! | |||||
| Home | LDraw | MLCad | LSynth | LDView | Instructions | Wallpapers | Space | Western | Miscellaneous | About me | Sitemap | Contact | ||||
| All content is provided as is, with no warranty stated or implied regarding the quality or accuracy of any content on or off this site. LEGO® is a trademark of the LEGO Group of companies which does not sponsor, authorize or endorse this site. |
||||