| [ english ] | [ deutsch ] | [ italiano ] |
|
| Home > LSynth > Tutorial: Running LSynth | Last update: 26.01.2016 |
|
|||||
| This tutorial will teach you how to run the hose and band synthesizer LSynth through MLCad's interface. Furthermore it will show you tips and tricks and help troubleshoot problems you might encounter. The tutorial takes for granted that you have installed the LDraw Parts Library, MLCad and LSynth, you have further downloaded and installed the package with unofficial parts from the LDraw Parts Tracker, your LDraw system is running smoothly and that you are at least a little familiar with the building editor. The tutorial is based on MLCad 3.5 and LSynth 3.1 and is grouped into the following sections: Installing LSynth Setting up MLCad Creating a LSynth synthesis |
|||||
| Read the first two section ONLY if the LDraw All-In-One-Installer has failed or won't run on your OS. This is most true if you are still using Windows 95, 98, ME, NT Ver 4, 2000, or XP below SP2. | |||||
Installing LSynth |
|
||||
| Navigate to the LSynth website http://lsynth.sourceforge.net/LSynth.html and download the LSynth_3_1_setup.exe setup wizard to your harddisc. Launch the setup wizard. Before you are presented with the installers start screen and the page with the license agreement you might get a warning on Windows Vista or higher based on the settings in the UAC (User Account Control). Select Yes to proceed with the installation. Please read http://en.wikipedia.org/wiki/User_Account_Control what this warning is all about. | |||||
 |
|||
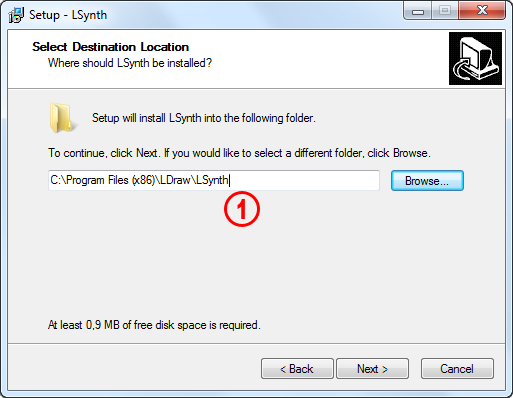
| 1. | Enter C:\Program Files (x86)\LDraw\LSynth when asked for the install folder. This tutorial assumes that the path to the LSynth.exe file and - more important - the \Bin\ folder is C:\Program Files (x86)\LDraw\LSynth. All references to the location of files and directories make this assumption. Create short cuts in the Start Menu folder and a desktop icon if you want but don't launch LSynth yet. NOTE! C:\Program Files (x86)\LDraw is the default program folder for all programs of the LDraw Suite. |
||
Please download the latest LSynth.mpd file which specifies hose and band synthesis definitions, as well as the constraints for both hose and band synthesis. In older versions of the program these definitions were hard coded in the program and have been outsourced since version 3.0 to an editable file for easy modification and maintenance by the users:
Unzip the content to the \bin\ folder located in LSynth's root, overwriting the already existing file (but make sure you have created a backup file first ). Download also the package with the latest constraint files. The LSynth constraints will be treated as unofficial LDraw part files and stored in a special folder. Make sure you understand how unofficial parts should be included in programs such as MLCad by reading the tutorial to customize MLCad a bit through the MLCad.ini file first.:
This tutorial assumes that the base directory for LDraw containing the \PARTS\ and \P\ folder as well as the \Unofficial\ folder is C:\Users\Public\Public Documents\LDraw. Unpack the content to C:\Users\Public\Public Documents\LDraw\Unofficial\Parts. |
||||||||||
|
||||||||||||||||||||||||||||||||||||||||||||||||||||||||||||||||||||||||||||||||||
| You'll further find two official part files in the constraint package. These have been edited to be visible in the parts tree window. Copy also these files in the \Unofficial\Parts folder. | ||
|
Setting up MLCad |
|
|||
| Before we dive into the nuts'n'bolts of part synthesis we have to make sure that MLCad and LSynth work well together. First we have to tell MLCad the absolute path to LSynth containing the \Bin\ folder as well as the location of the constraint files. Please download the latest MLCad.ini file which ships with all the new exciting synthesis types supported by LSynth 3.1 from the MLCad.ini tutorial page. Unzip the content in MLCad's Appdata folder at %AppData%\Roaming\Ing. Michael Lachmann\MLCad which on most computers translates into C:\Users\<user>\AppData\Roaming\Ing. Michael Lachmann\MLCad overwriting the already existing file (but make sure you have created a backup file first in case you have customized the file to your needs). Open the MLCad.ini file in an editor or a word-processing program and scroll down towards the end of the document where it reads: |
||||
 |
|||
| 2. | In case there is a semicolon "; " in front of: ; 3 = SHOW <LDRAWDIR>Unofficial\Parts ; 4 = HIDE <LDRAWDIR>Unofficial\P remove it in order to read: [SCAN_ORDER] 1 = SHOW <LDRAWDIR>Parts 2 = HIDE <LDRAWDIR>P 3 = SHOW <LDRAWDIR>Unofficial\Parts 4 = HIDE <LDRAWDIR>Unofficial\P NOTE! In case MLCad is unable to read the <LDRAWDIR> keyword indicating relative paths you have to either define LDRAWDIR as environmental variable in your OS or omit the keyword altogether and define the absolute path (if your filename contains spaces, the entire filename must be enclosed in double quotes which is standard for any Windows command line with long filenames). According to the assumption above the code would be: 3 = SHOW "C:\Users\Public\Public Documents\LDraw\Unofficial\Parts" 4 = HIDE "C:\Users\Public\Public Documents\LDraw\Unofficial\P" |
||||
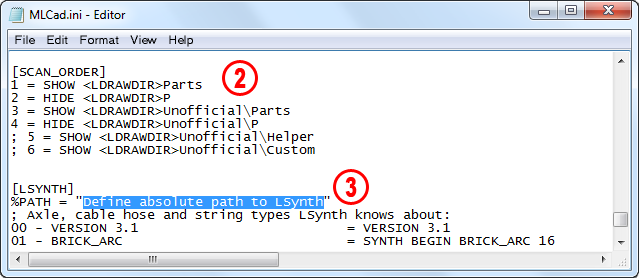
| 3. | Substitute "Define the absolute path to LSynth" with "C:\Program Files (x86)\LDraw\LSynth": | ||||
| [LSYNTH] %PATH = "C:\Program Files (x86)\LDraw\LSynth" ; Axle, cable, hose and string types LSynth knows about: 00 - VERSION 3.1 = VERSION 3.1 01 - BRICK_ARC = SYNTH BEGIN BRICK_ARC 16 ... Visibility Statement: HIDE = SYNTH HIDE ; End of file NOTE! We define the path containing the bin\ folder and NOT the program lsynthcp - the console based synthesizer that reads in the DAT file and writes out a new DAT file with the synthesized parts. The quotes are important in case your path contains blanks. |
|||||
| Users already familiar with LSynth will also recognize the typical META commands needed to synthesize hoses and bands. At the top of the .ini file the more skilled users will also find additional information about this section. For now save your work and close the file. To easily access the LSynth constraint parts in the parts tree as well as the parts preview window it is wise to add a new category to MLCad's Parts Library Tree. Please launch MLCad to set up the program: |
||
(The screenshot shows all dialogs in one composed image).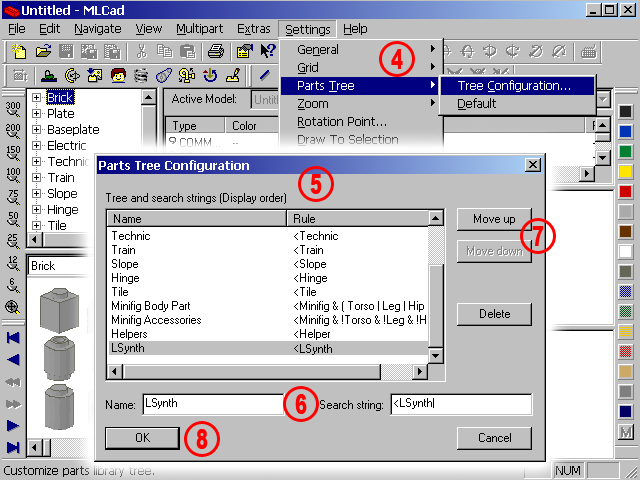 |
|
| 4. | Select the Settings menu, the Parts Tree tab, then Tree Configuration... (Settings > Parts Tree > Tree Configuration...). |
|
|||||||
| 5. | This will pop up the Parts Tree Configuration dialog. | ||||||||
| 6. | Enter the following two statements in the boxes at the bottom of the dialog: Name: LSynth Search string: <LSynth |
||||||||
| 7. | You might change the order of the categories by clicking the Move Up or Move Down buttons. | ||||||||
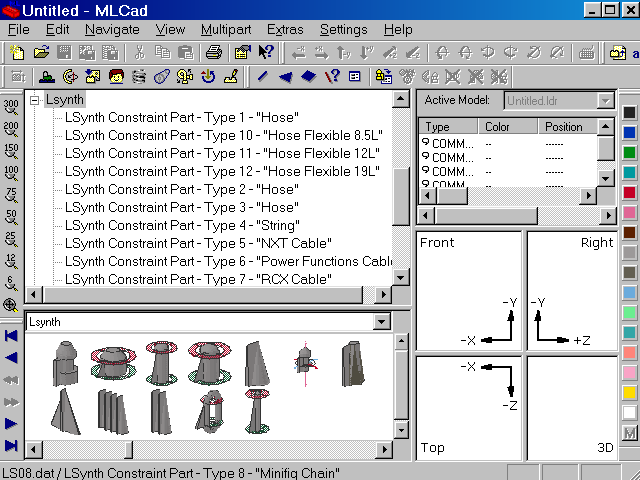
| 8. | Confirm your insertion and exit the Parts Tree Configuration dialog by selecting OK. At this point your Parts Tree should list the LSynth constraints as following: | ||||||||
 |
 |
Creating a LSynth synthesis |
|
|||
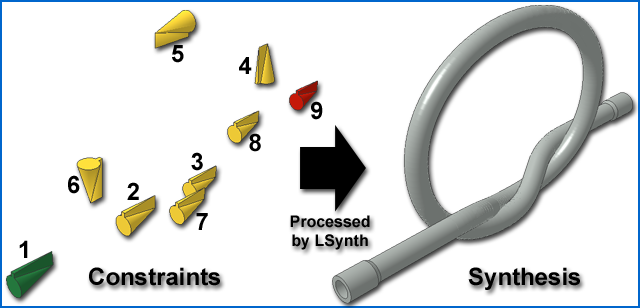
| You are ready for your first synthesis! LSynth distinguishes between two types of synthesis: hoses and bands, with the difference that bands are closed and their path is determined by pulleys, gears or notched wheels, while hoses meander along specific points working as pass-through. Check out the page with examples in order to get a deeper understanding. This tutorial will limit to hose synthesises only. | ||||
 |
|
| If you have already collected some experience with hoses in the LEGO Digital Designer, in short LDD, you should be aware that things are a bit different in LSynth. Instead of working with the flexible part itself, which will automatically flex according to the position of the end pieces to each other, in LSynth you are working with markers and pass-throughs, called constraints by LSynth, which once processed by the program generate the synthesized part. The lack of immediate visual feedback is hereby greatly compensated by the ability to generate very complex windings you could never get in LDD, such as the above knot. Be furthermore advised that the constraints are the only parts needed to design the path the hose has to follow. All other parts are just there to help positioning the constraints (the opposite is true for band synthesis where you're working exclusively with pulleys, gears, notched wheels and the like, with no involvment of constraint parts). |
||
(The screenshot shows all menus and dialogs in one composed image).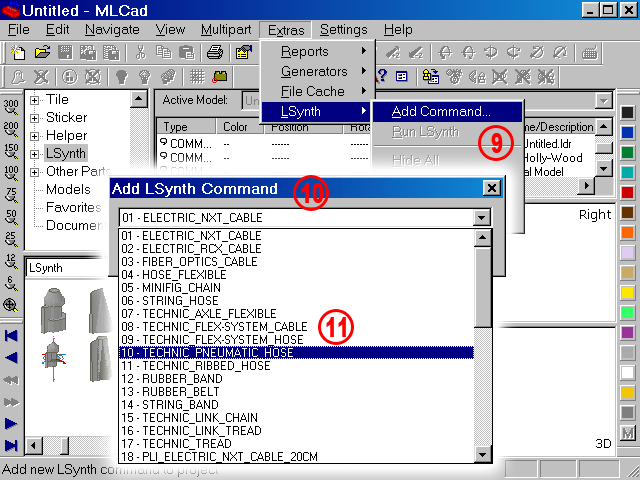 |
|
| 9. | Select Extras > LSynth > Add Command... or click on the Add Command icon in the Expert Toolbar. | ||
| 10. | The LSynth Command dialog will pop up. The drop down box shows all the LSynth META statement previously inserted in the MLCad.ini file. NOTE! The numbers in front of the meta commands have no other significance then to ensure that the statements get listed accordingly to their type instead of an alphabetical order. |
||
| 11. | Pick the type you like and confirm your choice by clicking the OK button. For this tutorial we will move on using a simple TECHNIC_PNEUMATIC_HOSE. | ||
(The screenshot shows all menus and dialogs in one composed image).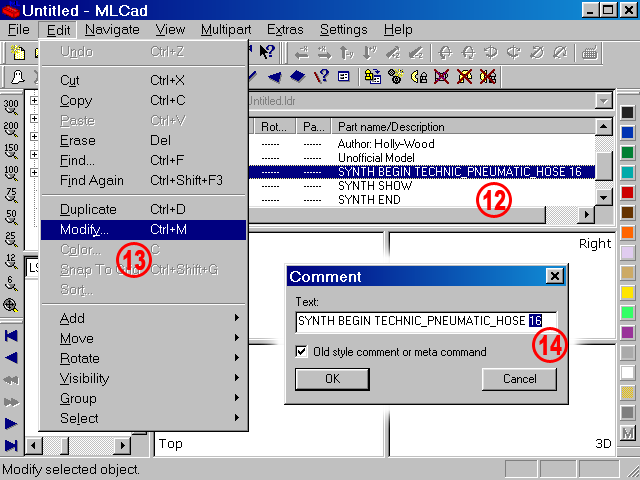 |
|
| 12. | MLCad inserts the corresponding LSynth META statement followed by a SHOW and END statement. SYNTH BEGIN TECHNIC_PNEUMATIC_HOSE 16 SYNTH SHOW SYNTH END The number at the end of the SYNTH BEGIN command defines the LDraw color number of the synthesized result. |
||||||||
| 13. | You might change the color once the synthesis has been generated by selecting all the synthesis parts using the menu Edit > Select > Same Type but, taking advantage of LSynth's color support , it's much more convenient defining the color right from the start. Select Edit > Modify... from the menu bar or click the appropriate icon in the Objectbar or directly double-click the comment in the File Parts List pane. This will open the Comment dialog. | ||||||||
| 14. | Substitute the default main color 16 with your desired LDraw color number and click the OK button. Make sure that Old style comment or meta command is checked. NOTE! The default color 16 - Main Color is defined in the MLCad.ini file. Edit the file to change the color permanently: 01 ELECTRIC_NXT_CABLE = SYNTH BEGIN ELECTRIC_NXT_CABLE 25 11 TECHNIC_PNEUMATIC_HOSE = SYNTH BEGIN TECHNIC_PNEUMATIC_HOSE 4 ... |
||||||||
 |
|
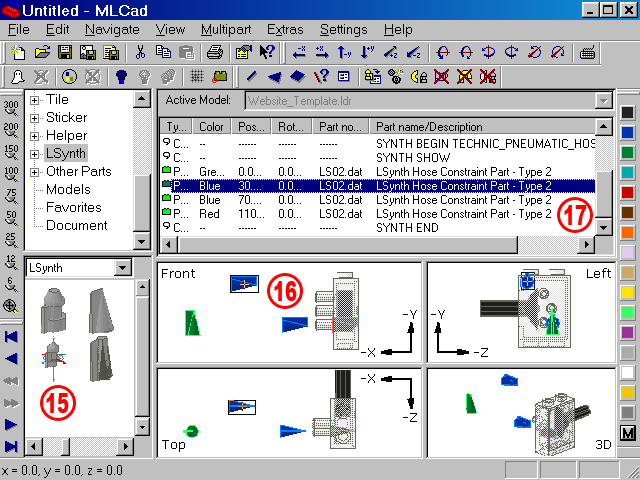
| 15. | Select the LSynth category in the Parts Tree to get a preview of the available constraint parts. Pick your favourite - they look different but function the same - and position it in MLCad's, so called, panes. I'll go for LS02.dat - LSynth Hose Constraint Part - Type 2, a constraint I designed during LSynth's beta test. NOTE! To get a straight section in the synthesis made of a stretched element position your constraints on a virtual straight line. In the example above the blue constraint number 3 and the red end constraint share the same coordinates on the Y and Z axis. |
||||
| 16. | It is good advice to color your constraints. In a file containing more than one synthesis it can become hard to spot which constraint belongs to a specific synthesis. This is especially true when LSynth returns a weird looking result because you positioned or sorted your constraints wrongly and you have to find the odd one out. Even in a file with just one synthesis I usually organize my work by coloring the start constraint green, the end constraint red and assign to all other constraints defining the pass-through a common color different from the LDraw main color 16. If your constraint overlaps with a part you can make that part [in this case a "4694c01.dat - Technic Pneumatic Switch complete assembly (neutral position)"] transparent to ease positioning. |
||||
| 17. | While the SYNTH END command is crucial only for LSynth the SYNTH SHOW statement will also be used by MLCad for internal handling, defining the hidden status of constraint parts and synthesized parts. All hose and band constraints MUST be placed between the visibility statement SYNTH SHOW or HIDE and the SYNTH END statement! | ||||
 |
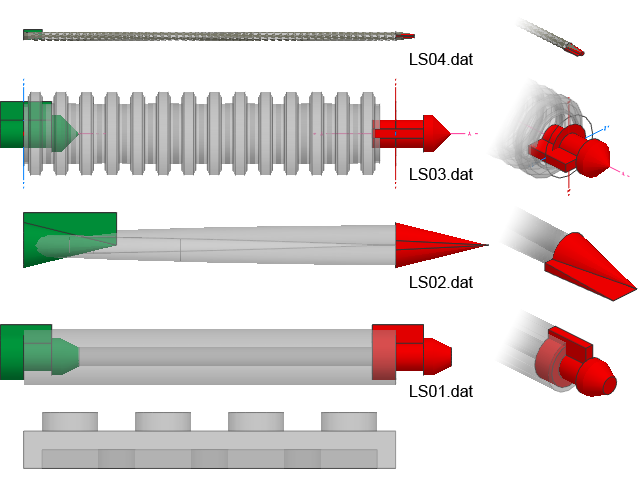 |
| As pointed out above the provided constraints look different but will be treated by LSynth the same with the exception that constraints with green and red rings should be used exclusively for hose-type synthesis with a fixed lenght such as Minifig chains or Strings with a "xxL" identifier. You can even use LS01.dat as start constraint, LS03.dat as pass-through and end with LS02.dat. It's just a matter of taste. This is even true for LS04.dat - LSynth Constraint Part - Type 4 - "String" or LS06.dat - LSynth Constraint Part - Type 6 - "Power Functions Cable" though they have been specially designed for the STRING_HOSE or a ELECTRIC_POWER_FUNCTIONS_CABLE. You have however to take care how you're going to position them in the 3D-environment, because the constraints have two characteristics: the origin plane and the flag indicating its orientation:
|
||
(The screenshot shows all menus and dialogs in one composed image).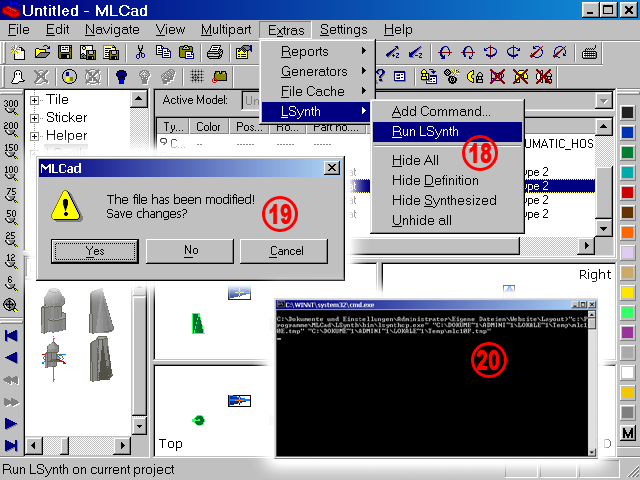 |
|
| 18. | Once all constraints are in place choose Extras > LSynth > Run LSynth from the menu bar or click the icon with the command mirrored in the Expert Toolbar. | ||
| 19. | When working on a new file which has never been saved, MLCad will ask you if you want to save your work before sending the package to LSynth. It is highly recommended to do so 'cos this will function as workaround for MLCad's not properly working Undo. This will be covered in greater detail later in the tutorial - for now save your work by naming it LSynth_Tutorial_Constraints-only.ldr. | ||
| 20. | On a slow computer you will glimpse popping up a DOS command prompt window performing the synthesis and closing immediately afterwards. In fact MLCad does nothing else than creating a temporary file and batch-filing LSynth. | ||
 |
|
| 21. | Congratulation! At this point you should have created your first pneumatic hose. You haven't?! Have a look at the troubleshooting chapter. | ||
| 22. | Right-click in one of the panes and select Bounding Box to see how the single synthesized parts have been arranged to build up the hose. | ||
| 23. | Once the synthesis has been performed MLCad assigns a hidden status to the constraint parts. Use the visibility commands from the Extras > LSynth menu or the icons in the Expert Toolbar to: | ||
|
||||||||||
| This feature is useful when you want to redirect the path of the synthesized parts because the result doesn't quite meet your expectations. By hiding/unhiding you get a feeling which constraint has to be repositioned or deleted. But before you start tweaking you have to get rid off the synthesises and the additional meta commands LSynth has added. Because MLCad does process the synthesis through an external program the newly added Undo feature in MLCad 3.4 does not work properly. We workaround by reloading the file saved earlier in the tutorial. | |||
 |
|
| 24. | Select File > Revert and discard all changes by clicking the Yes button in the pop-up. LSynth_Tutorial_Constraints-only.ldr will be reloaded. Saving your work every time before you perform a synthesis will save you from a lot of frustration! | ||
 |
|
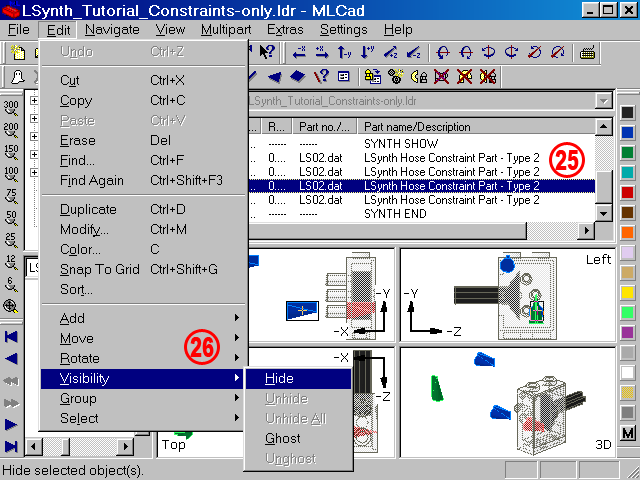
| 25. | To substitute the straight section at the end with a smooth curve you would have to either reposition/rotate the selected constraint or remove it so that LSynth doesn't "see" it when it calculates the path. The fewer points a synthesis has to go through, the smoother the result will be. I go for the removal because from experience I learned that it is quite tiresome to find the perfect coordinates and rotation angle. (But also to show you some tricks ;-) The easiest way would be deleting the constraint but we would loose the data entirely - not very practical. Moving the constraint out of the synthesis section, say below the SYNTH END meta command or above SYNTH BEGIN... could be an option, but the fastest way is using the newly added support of MLCad's HIDE meta command. |
|
|
| 26. | Select Edit > Visibility >Hide or click the related icon in the Visibility Toolbar to hide the selected constraint. | ||
 |
|
| 27. | Running LSynth again, the program will ignore the hidden constraint. | ||
| 28. | If the result satisfies your expectations you can delete the constrain or move it out of the synthesis section and finally save your work. It is recommended that you use the File > Save As... command and rename the file to something else like LSynth_Tutorial_Synthesis.ldr or LSynth_Tutorial_Processed.ldr or ... in order to keep a preprocessed version as backup. | ||
Are you still seeking more information on the topic? Check out also the troubleshooting chapter and the page with LSynth examples. In addition you might have a closer look at the files used for the tutorial:
|
|
|||||||||
| LEg GOdt! | ||||||||||
| Home | LDraw | MLCad | LSynth | LDView | Instructions | Wallpapers | Space | Western | Miscellaneous | About me | Sitemap | Contact | ||||
| All content is provided as is, with no warranty stated or implied regarding the quality or accuracy of any content on or off this site. LEGO® is a trademark of the LEGO Group of companies which does not sponsor, authorize or endorse this site. |
||||
