Holly-Wood.it  
    Brick 1 x 3
Brick 2 x 2 Corner    
  Brick 1 x 1  
[ english ] deutsch ] italiano ]
 
  Home > MLCad > Tutorial: Digital building - Page 4 of 9  
     
  Page <Previous 1 2 3 4 5 6 7 8 9 Next>  
  Screenshot 12
 
  35. Do you remember that a part has been added to the Favorites sub-directory in the Parts Tree at the very beginning of this tutorial? Use that Plate 1 x 1 and stack three of them one on another. Try using the different techniques you've learned so far: Drag'n'drop, duplicating with CTRL, duplicating with menu and/or shortcuts. Brick 1x3


Multiple selection

     
  36. Go to the Project Parts List or the Front/Right view pane in the building area. Select the plate at the top and select the plate underneath while you keep the CTRL key pressed. Use multiply selection to modify several parts at once, either to move them to a new location or color all of them in one go. To cancel a selection or unselect all items in the building area click somewhere in the viewing panes not containing a part. Assign Trans_Clear as the color for your multiple selection.

NOTE! In the Project Parts List you might use also the SHIFT key for multiple selection. The difference between the SHIFT and the CRTL key is that the latter allows a random selection of all the parts you click, while SHIFT selects all the parts between the first and last part selected. To select all parts at once either press the Select All Select All Button button in the Control bar or use it's correspondent in the menu Edit > Select > All.

Have also a look at Select Same Type Select Same Type Button and Select Same Color Select Same Color Button. Same Color should be pretty self-explaining and really doesn't do anything else than selecting all the parts of the same color. Same Type not only selects, say all the Plates 1 x 1 or Brick 2 x 4 in the current project, but works also with "Primitives", "Comments" and "Meta-Commands" like STEP or CLEAR.
To cancel a selection or unselect all items in the Project Parts List click in the small area between the last entry and the bottom slider/border of the Project Parts List pane.
 
Brick 1x2
Brick 1x1 Round Red
Brick 1x1 Round
Screenshot 13
 
  37. Add the following parts yourself:
4073 - Plate 1 x 1 Round, Dark Gray   4073 - Plate 1 x 1 Round, Dark Gray
3070b – Tile 1 x 1 with Groove, Yellow 3070b - Tile 1 x 1 with Groove, Yellow
3665 – Slope Brick 45 2 x 1 Inverted, Yellow 3665 - Slope Brick 45 2 x 1 Inverted, Yellow
4871 – Slope Brick 45 4 x 2 Double Inverted with Open Center, Yellow 4871 - Slope Brick 45 4 x 2 Double Inverted with Open Center, Yellow
3020 – Plate 2 x 4, Yellow 3020 - Plate 2 x 4, Yellow
2540 – Plate 1 x 2 with Handle, Light Gray 2540 - Plate 1 x 2 with Handle, Light Gray

 
  Brick 2x4
  38. In case the pictures in the building area look wrong or do not update after you've added a new part just select View > Refresh or hit CTRL+R. It is very unlikely though that it will happen with such a small number of parts. It is more likely that you need to refresh the screen after processing external programs like LSynth or reverting to a version previously saved.
Finally save your work once again and name it Basic_02.ldr.


Organizing your parts tree


 Brick 3x3 (The screenshot shows all menus and dialogs in one composed image).
Screenshot 14
 
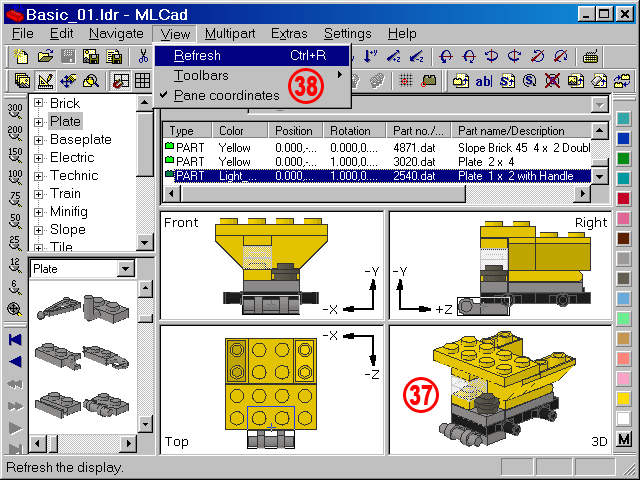
  39. Before adding the missing wheels and tires we further tweak MLCad a bit. All the wheels are grouped along with wedges, windows, windscreens and wings in the Others > W tree - not very comfortable to browse. Creating a sub-directory containing exclusively wheels will solve the problem. Call up the Parts Tree Configuration dialog selecting Settings > Parts Tree > Tree Configuration...
Brick 1x3
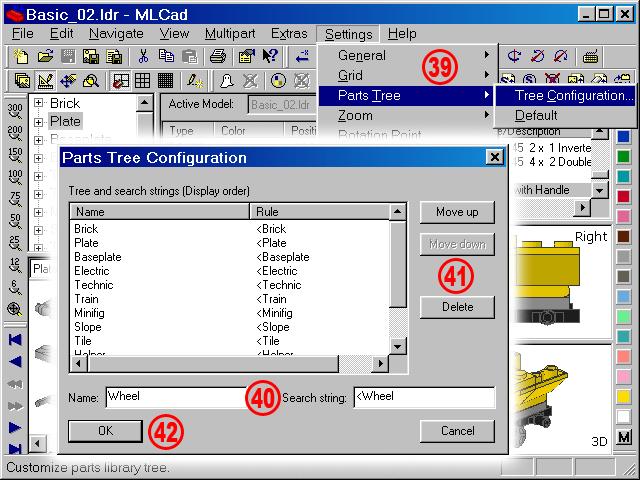
  40. Enter Wheel in the empty Name: field. This entry will ultimately show up in the Parts Tree. The naming is in no way tight to the search string. This means you might create sub-directories called "Decorated" or "Space parts" or Castle Walls" and link them to specific search strings.
Type <Wheel in the Search string: field. As for the search string in the Find command, MLCad supports the following operators:
   
   
WORD Add all parts which contain WORD in the description
<WORD Adds parts their description begins with WORD
WORD> Add parts their description ends with WORD
WORD1 & WORD2 Both WORD1 and WORD2 must be found in the description
WORD1 | WORD2 Either WORD1 or WORD2 must be found
!WORD The description must not contain WORD
Obviously also combination of these operators are supported:
<WORD1 & !WORD2 & WORD3 Groups parts their description begins with WORD1, contains WORD3 but does not contain WORD2
( WORD1 | WORD2 ) & WORD3 Use brackets to group keywords for complex searches. ( WORD1 | WORD2 ) & WORD3 will produce a different result than WORD1 | ( WORD2 & WORD3 ). Pay attention to the space between the brackets and the keywords.
     
    The string is not case sensitive and it is possible to have the same parts in multiple sub-directories. A Minifig Torso can be grouped with <Minifig and at the same time be in a sub-directory minifig & torso. The difference is that the first directory will contain all Minifig parts such as torsos, legs, arms and accessories, while the second will list exclusively Minifig Torsos. To modify a default search strings just click the sub-directory in the Tree and search strings (Display order) box and change the search string entry – changes will apply after you have OK-ed your modifications. It is worth mentioning that the Name: and Search string: fields have to be empty if you want to add a new sub-directory. If a sub-directory is selected in the Tree and search strings (Display order) box, it will be modified! In case you've selected a sub-directory by error, click in the small space between the last sub-directory and the slider at the bottom of the box to get the entry fields cleared. If you messed-up your tree select Settings > Parts Tree > Default to reset the Parts Tree – all modifications but also all additions to the tree will be deleted.

NOTE! The settings are stored in a file called MLCad.grp in the MLCad root directory and are human readably with a normal text editor – a fine method to share your settings with others.
  41. The Move up and Move down buttons will help organize the main branches of the tree. However new sub-directories can be moved only after they have been added. This means that you'll have to recall the Parts Tree Configuration dialog after confirming the addition. Obviously sub-directories can also be Deleted – a really bad idea when applied to the default sub-directories: Deleting for example the Plate sub-directory forces MLCad to move all Plates to the Others > P sub-directory (the program will do it in a wink of an eye but it will you take ages to browse all the Panels and Plants to get to the Plates.
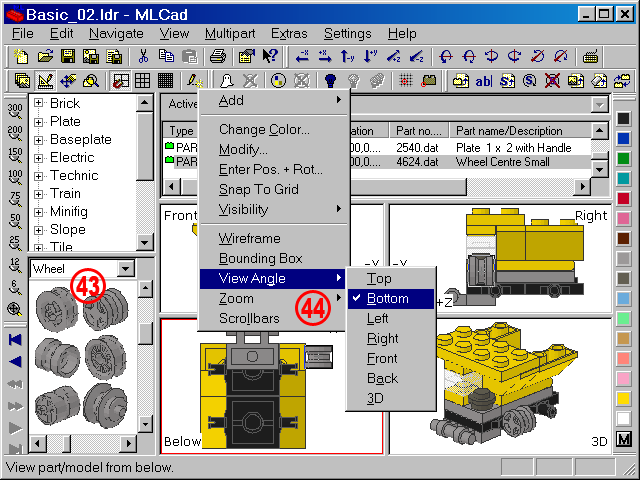
  42. Close the dialog by hitting OK. The Wheel sub-directory should have been added to the Parts Tree.
 
  Screenshot 14
 
  43. Drag and drop a 4624 – Wheel Centre Small, Light Gray somewhere in the building area. The exact place is not important for now and also the correct rotation doesn't matter, but near the left front wheel axle will help.  
  44. Select the pane showing the Top view and change it to a view point from Below.
top  
    Page <Previous 1 2 3 4 5 6 7 8 9 Next>  
  Brick 1x3
All content is provided as is, with no warranty stated or implied regarding the quality or accuracy of any content on or off this site.
LEGO® is a trademark of the LEGO Group of companies which does not sponsor, authorize or endorse this site.