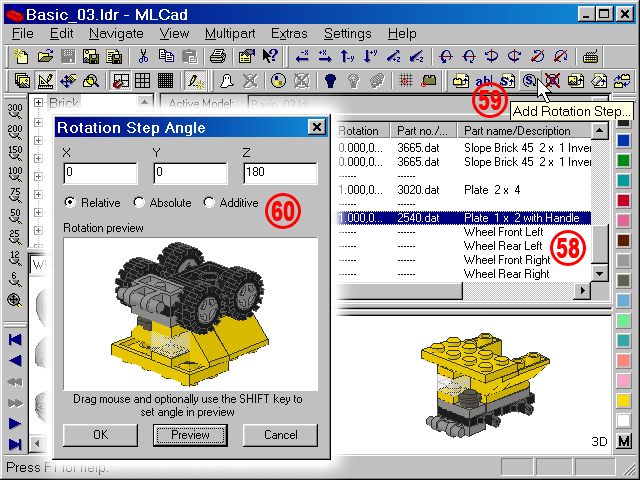
Holly-Wood.it  
    Brick 1 x 3
Brick 2 x 2 Corner    
  Brick 1 x 1  
[ english ] deutsch ] italiano ]
 
  Home > MLCad > Tutorial: Digital building - Page 6 of 9  
     
  Page <Previous 1 2 3 4 5 6 7 8 9 Next>  
  (The screenshot shows all menus and dialogs in one composed image).
Screenshot 21
   
  55. There are several ways to navigate the Projects Parts List. The most intuitive approach is obviously the mouse scroll wheel (after the pane has been activated) and the sliders. Nonetheless keep also an eye at the buttons in the Control bar Control Bar or the corresponding Navigate commands in the menu. Anyway, the fastest way to jump from one part to the next are the
Page Up/Page down keys.
 
  56. Going through the Project Parts List part by part you can watch the project being built. Stop at the part that should be the last in your building step ...  
Brick 3x3 57. ... and hit the Add Step button Add Step Button in the Object bar to insert a step command (if you prefer the long way use Edit > Add > Step from the menu or Add > Step from the contextual menu in the Project Parts List pane).
You might ask yourself why not using the Autosteps feature accessible via Edit > Add > Autosteps... which apparently could according to the dialog:
  • Insert step after every change in height
  • Insert step after a fixed number of parts whit the option to define the number
doing the job in the wink of an eye? A quick test run will reveal that 4531 - Hinge Tile 1 x 2 with 2 Fingers and 4275b – Hinge Plate 1 x 2 with 3 Fingers and Hollow Studs will be grouped into the same step when selecting the height criteria, because they share the same origin. Also a step after a fixed number of parts would produce some odd results. It might sound odd but the general rule for building instructions is that generally they do not follow a fixed rule. They should be really crafted manually with tons of common sense. Use Autosteps only for a quick shot in combination with the Sort feature and on very simple projects. Also because Autosteps do not insert any Rotation Steps...


Rotation steps


  (The screenshot shows all menus and dialogs in one composed image).
Screenshot 22
 
  58. Add the missing building steps until you arrive to the 2540 – Plate 1 x 2 with Handle. Select the part...  
  Brick 1x4
  59. ... and choose Add Rotation Step... Add Rotation Step Button in the toolbar to open the Rotation Step Angle dialog (as usual also the so-called "Rot-Steps" might be called via an alternative way as the ordinary steps).
  60. Enter 180 in the Z field, check the radio-button Relative and hit the Preview button. Here you are!
  • The X, Y and Z fields accept degree values in the range from -360 to +360.
  • The three radio buttons Relative, Absolute, Additive determines how the project will be rotated in the relationship to its current view angle.
    • Relative turns the project relative to the default view angle. If you have rotated your project in the 3D view pane of the building area Relative will take those angles as starting point for its calculations.
    • Absolute will overwrite the default view angle in the 3D pane and set the view point of the rot-step exactly at the values you enter in the X, Y and Z fields.
    • Additive turns the project based on the previous rotation steps adding the entered values to the already existing view angles. Since MLCad copies solely the default view angle from the 3D view pane to the Rotation preview and in this very moment knows nothing about the previous Rot-Steps the Preview button is disabled and you'll have to go forth and back to the View Mode to check your settings – not very comfortable giving the fact that the other two rotation modes work flawlessly.
  • If you aren't familiar with angles, degrees and such take the advice given below the preview as starting point and use the mouse to rotate your project in the Rotation preview. Select Relative or Absolute and start turning your project by holding the left mouse-button. Releasing the mouse-button you'll see how the values in the X, Y and Z field have changed. If you're close to the view angle you are looking for, substitute the figures with rounded numbers such as 45, 32,
    90, ...
  • The Preview button only works in combination with the entry fields. Hit the button after you've entered your figures to get a visual feedback.
 
  Screenshot 23
 
Brick 2x3 61. Go right to the end of the Projects Parts List (remember that using the CRTL+Page Down key is the fastest way, but also the button in the Control bar will get you there in no time. Add a Rotation End Step Add Rotation End Step Button.

NOTE! The ordinary Step in front of the Rotation End Step has been added to guarantee that the wheels are still shown in the rotated view though there was no additional building step after them and the final project is shown in its glory as very last image – just the way you'll find in official LEGO instructions.

The Rotation End Step will display the project in the default view angle. If you want to show just one building step with a flipped view add the Rotation End Step as next step after the Rotation Step:
Brick 1x4
 
  Screenshot Rotation Step 1
 
   
Icon Part   Plate 2 x 2 with Wheels Holder
Icon Part Plate 2 x 2 with Wheels Holder
Icon Step Step
Icon Part Plate 1 x 2 with Handle
Icon Rotation Step Rotation Step
Icon Part Plate 1 x 2
Icon Part Hinge Tile 1 x 2 with 2 Fingers
Icon Rotation End Step Rotation End Step
 
 
    You might add ordinary steps in between if you want to show more building steps in the
rotated view:
 
 
  Screenshot Rotation Step 2
 
   
Icon Part   Plate 2 x 2 with Wheels Holder
Icon Part Plate 2 x 2 with Wheels Holder
Icon Step Step
Icon Part Plate 1 x 2 with Handle
Icon Rotation Step Rotation Step
Icon Group Group Wheel Front Left
Icon Group Group Wheel Rear Left
Icon Step Step
Icon Group Group Wheel Front Right
Icon Group Group Wheel Rear Right
Icon Step Step
Icon Part Plate 1 x 2
Icon Part Hinge Tile 1 x 2 with 2 Fingers
Icon Rotation End Step Rotation End Step
top  
  Page <Previous 1 2 3 4 5 6 7 8 9 Next>  
  Brick 1x3
All content is provided as is, with no warranty stated or implied regarding the quality or accuracy of any content on or off this site.
LEGO® is a trademark of the LEGO Group of companies which does not sponsor, authorize or endorse this site.