| |
24. |
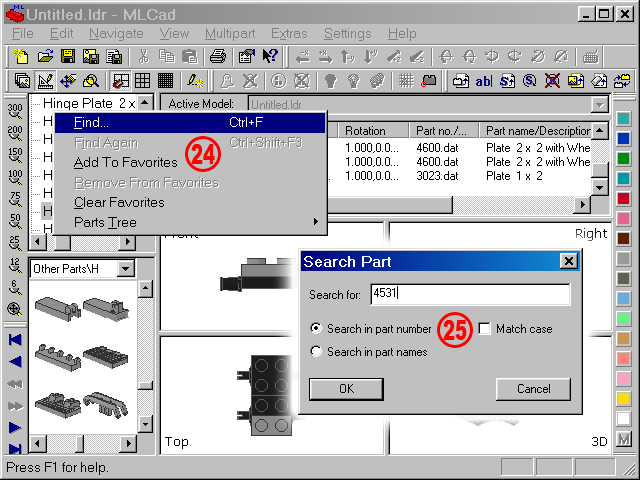
Searching the library can become time-consuming, especially at the beginning when you are unfamiliar with the naming conventions LDraw.org uses, though LEGO parts databases such as Peeron.com rely partly on the LDraw Parts Library. If you know the part number of the LEGO element you are looking for it becomes a piece of cake. Right-click the Parts Tree and select Find... in order to open the search dialog. Alternatively select Edit > Find... or use the shortkey CTRL+F. |
 |
| |
25. |
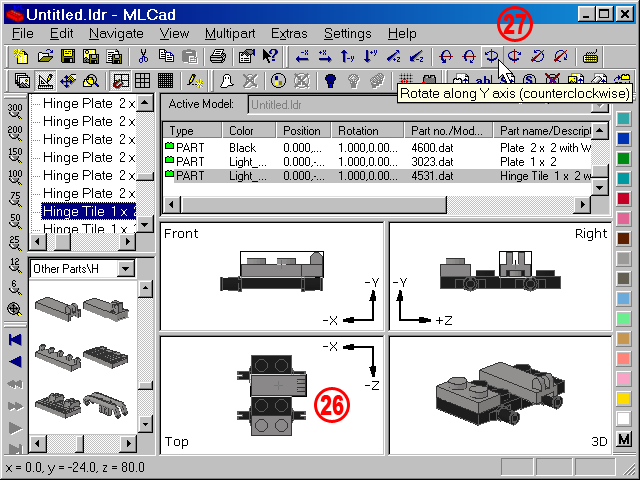
Enter the part number and select the radio button Search in part number. Selecting OK should have highlighted 4531 - Hinge Tile 1 x 2 with 2 Fingers.
Obviously you might also search the library also via a search string as you have already figured out looking at the other entries in the dialog. MLCad supports the following operators: |
| |
|
|
|
| |
|
| WORD |
Finds all parts which contain WORD in the description |
| <WORD |
Finds parts their description begins with WORD |
| WORD> |
Finds parts their description ends with WORD |
| WORD1 & WORD2 |
Both WORD1 and WORD2 must be found in the description |
| WORD1 | WORD2 |
Either WORD1 or WORD2 must be found |
| !WORD |
The description must not contain WORD |
| Obviously also combination of these operators are supported: |
| <WORD1 & !WORD2 & WORD3 |
Finds parts their description begins with WORD1, contains WORD3 but does not contain WORD2 |
| ( WORD1 | WORD2 ) & WORD3 |
Use brackets to group keywords for complex searches. ( WORD1 | WORD2 ) & WORD3 will produce a different result than WORD1 | ( WORD2 & WORD3 ). Pay attention to the space between the brackets and the keywords. |
|
|
| |
|
|
|
| |
|
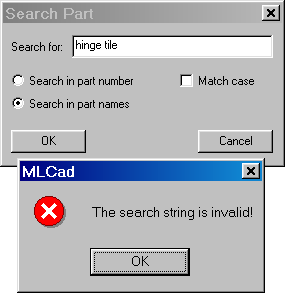
The string is not case sensitive but pay attention to include the operators if you are going to search for two or more words. With no operators at hand MLCad will complain that: |
|
| |
|
|
|
| |
|
 |
 |
| |
|
|
|
| |
|
It is also key to use a well defined search string on the whole. A generic search for "hinge" while looking for Hinge Tile 1 x 2 with 2 Fingers would turn up Animal Horse Hitching with Hinge first. You would have to call Find Again several times until the program has got through all the "hinge"-words in the parts titles A search for "<hinge & Tile" on the contrary would catch the part at the first spot. But again, perform a search via parts names solely if you have no part number at hand and no clues about the name. Nonetheless, a random search for a keyword is much faster than browsing the library sub-directory by sub-directory. This is most true when you enter the Other Parts sub-directory and its alphabetical listing of the parts that didn't fit in the main directories.
NOTE! The shortcut for Find Again is CTRL+SHIFT+F and not CTRL+SHIFT+F3. This is a known bug and should be corrected in the upcoming version. |
|
| |
|
|
|
| |
Rotate/move and copy/duplicate parts |
|
| |
|
|
|
| |
26. |
Drag and drop the Hinge Tile 1 x 2 with 2 Fingers to the project. Make sure the Plate 1 x 2 has been selected in the building area or the Project Parts List first. It guarantees that the new added parts get the same color as the previous, as you have defined earlier in the settings.
All parts in the library come with a default orientation and origin (usually at the top of the part where the studs start rising). They usually have to be rotated and moved to the final position. |
|
| |
27. |
Use the Transformation bar  to rotate and move your part quickly or use the Edit > Rotate and Edit > Move menus if your computer doesn't have a mouse. If you are unsure about the correct axes and direction take a look at the corners of the panes – select View > Pane coordinates from the menu if your screen doesn't show anything. The coordinates tell you how the part and the project is located in reference to the global origin. The Front and Right view show that the part has to be rotated along the Y axis 90 degree counterclockwise or 270 degree (which equals to 3 clicks) clockwise. In addition you'll have to move it in a negative sense on the two other axes to get its final position at: -10.000, -16.000, 20.000. Just compare the -x at the pane coordinates with the -x above the arrow at the Transformation bar button to rotate and move your part quickly or use the Edit > Rotate and Edit > Move menus if your computer doesn't have a mouse. If you are unsure about the correct axes and direction take a look at the corners of the panes – select View > Pane coordinates from the menu if your screen doesn't show anything. The coordinates tell you how the part and the project is located in reference to the global origin. The Front and Right view show that the part has to be rotated along the Y axis 90 degree counterclockwise or 270 degree (which equals to 3 clicks) clockwise. In addition you'll have to move it in a negative sense on the two other axes to get its final position at: -10.000, -16.000, 20.000. Just compare the -x at the pane coordinates with the -x above the arrow at the Transformation bar button  . .
NOTE! If no part is selected the Transformation bar is grayed out since it doesn't make much sense to move or rotate Meta-Commands, comments, ... It is furthermore grayed out when you switch to the View Mode.
Since we need two of these Hinges you could either drag the part by holding the CTRL key as already shown above or duplicate it and move it to its parallel position at 10.000, -16.000, 20.000 in a second step. There are two alternatives for the latter. Select the part you want to duplicate and execute Edit > Duplicate from the menu or press CTRL+D if you are in a hurry. The command works also for multiple selections, Meta-Commands, Comments or special elements like "Ghost " or background images. If you want to duplicate a part which is inserted in the Project Parts List at a different position use Copy  and Paste and Paste  or CTRL+C, CTRL+V. or CTRL+C, CTRL+V. |
| |
| |
28. |
The Status bar will also tell you the color name when you point the cursor to a color button in the Color bar. Using the bar is by far the fastest way to change the color of a part. Just make sure the part you want to color is selected and hit the button in the Color bar. The part will be colored in the building area and the name in the Color column in the Project Parts List will change. If the desired color cannot be found among these 16 color buttons you'll have to call up MLCad's color dialog. The dialog gives you access to all the colors used by the LEGO Company so far.
NOTE! The colors in the Color bar are the original core colors used by the LDraw program written by James Jessiman back in 1995 and differ from the RGB shadow colors used by the LEGO Group. At the time the colors have been defined by Jessiman no color definitions form the LEGO Group where available and the chosen RGBs where then considered the closest match. In the 2009-update of the color chart it has been decided to maintain the old color definitions to guarantee backwards compatibility.
The colors are: Black, Blue, Green, Dark Cyan, Red, Magenta, Brown, Grey, Dark Grey, Light Blue, Light Green, Cyan, Light Red, Pink, Yellow and White and once you have learned how the color dialog works you'll be taught how to change them to something else. |
|
| |
|
|
| |
Modifying parts |
| |
|
|
| |
29. |
Select Modify... from the contextual menu in the Project Parts List (or Edit > Modify... in the menu, Modify... from the contextual menu in the building area, CTRL+M or simply P). |
| |
30. |
Sort the list of available part alphabetically by clicking the Part name header in the Select Part dialog. Feel free to sort the list numerically by part numbers, but from experience the counterpart of a hinge has a name which is very close to the original part and presumably very close in the list. |
| |
31. |
The dialog pops up with the original part highlighted. Browse the chart for 4275b – Hinge Plate 1 x 2 with 3 Fingers and Hollow Studs. Be careful with the names! LDraw aims to document all LEGO bricks ever molded and sometimes records variation of parts which have been modified by the LEGO group over the years. You'll find a Type 1 and 2 of the Plate 1 x 1 with Light Clip or the Minifig Helmet Classic with Thin or Thick Chin Guard. Variations which cause most trouble are those differing in hollow and solid studs. People using the LDraw System of Tools for prototyping often use the parts list of their project as shopping list. It is likely that you'll find tons of cheap part with hollow studs, but only a few at high price with solid studs; parts which were produced in certain colors only as solid stud version, while you are desperately looking for the hollow version which has never been produced in that shade. |
| |
32. |
Disregard the custom section (allowing the insertion of non-certified parts or even entire models) for now – there are much more elegant ways you'll learn once you're through with the basics. Hitting OK will insert the upper part perfectly fitting the lower part though they share the same coordinates – the lower part in fact has an origin that was chosen in prospect of the upper part.
NOTE! This bit of wizardry is considered "old style" among the LDraw part authors. Today's click hinge parts would have to be moved to fit. |
|
| |
|
|
|
| |
Using shortcuts |
|
| |
|
|
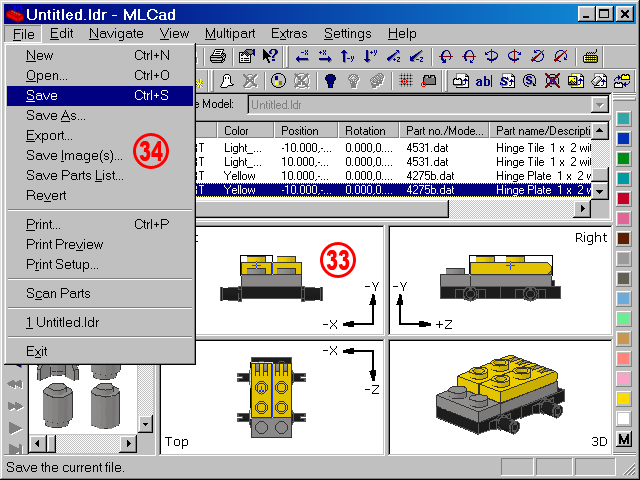
33. |
Color the Hinge Plate 1 x 2 with 3 Fingers and duplicate it. To move the second counterpart to the left try to use the keys – this is the fastest way to manipulate your parts. Here is a complete list of the hotkeys and shortcuts not documented in the menus. |
|
| |
|
|
| |
| Key |
Shortcut for |
| A |
Rotate clockwise along Y-Achses.
NOTE! This shortcut is, along with Ctrl+Cursor right, present twice since this is the most used rotation in standard stud-on-top building. |
| Cursor left |
Move -X |
| Cursor right |
Move +X |
| Cursor up |
Move +Z |
| Cursor down |
Move -Z |
| Home |
Move -Y |
| End |
Move +Y |
| Ctrl + Cursor left (Keypad 4) |
Rotate counterclockwise along Y-Achses |
| Ctrl + Cursor right (Keypad 6) |
Rotate clockwise along Y-Achses |
| Ctrl + Cursor up (Keypad 8) |
Rotate counterclockwise along X-Achses |
| Ctrl + Cursor down (Keypad 2) |
Rotate clockwise along X-Achses |
| Ctrl + Home (Keypad 7) |
Rotate counterclockwise along Z-Achses |
| Ctrl + End (Keypad 1) |
Rotate clockwise along Z-Achses |
| I |
Add new part (or copy and paste previous part) |
| P |
Modify selection |
| + |
Zoom In |
| - |
Zoom Out |
|
|
| |
|
|
| 34. |
Time to save the work you've done so far. Select File > Save and name the project Basic_01.ldr. The title in the Title bar will change from "Untitled" to the file's name. Since MLCad comes with no Undo feature (you'll surely have notice that there is an entry under Edit >Undo - but it is always grayed out) you can work around by saving often. File > Revert, will reload the file last saved.
NOTE! Instead of overwriting the same file time and again I use File > Save As... and create different version naming them _01, _02, ... These are just some KB on the hard disc but document the various stages of the build. |
|
| |
Page <Previous 1 2 3 4 5 6 7 8 9 Next> |
|